How to Step Up Your Entry Design With a New Welcome Mat

Right before the guests ring the doorbell or give the front door an old-fashioned knock, they step on your welcome mat. This mat serves two purposes: catching debris and adding style. Here are some ideas for how to give this entry detail a refresh before the hustle and bustle of the holiday season begin.

Welcome Mat 1: Caela McKeever, original photo on Houzz

Say Hello

A lettered mat can help you say exactly what you want to say when someone comes to your door. Obviously nothing says hello more than the word “hello.”

The simple greeting might also draw visitors’ eyes to the ground and remind them to take off their shoes before they step inside.

Coordinate Colors

If you have a colorful front door, use that as doormat inspiration. If your door lacks color, maybe it’s time to paint it.

Door paint: Scarlet Ribbons, Dulux

Welcome Mat 2: Zack | de Vito Architecture + Construction, original photo on Houzz

The whole mat doesn’t need to match the door. This striped mat draws on other colors found on the home’s exterior.

Welcome Mat 3: Rustic Porch, original photo on Houzz

Think Outside the Rectangle

Many front doors feature rectangular doormats, but other options exist. The semicircle mat in the photo works nicely with the rustic rockers, porch swing and shutters.

Welcome Mat 4: Garrison Hullinger Interior Design Inc., original photo on Houzz

Roll Out a Rug

A big, bold rug in front of the door adds color and life to this home’s entry, designed by Garrison Hullinger.

A large porch rug can also make the space feel like another room of the house. If you add a few chairs, people can stop, relax and enjoy the outdoors. Plus, more rug means more chances for it to pick up any water or dirt from the shoes of incoming guests.

Welcome Mat 5: Seattle Staged to Sell and Design LLC, original photo on Houzz

Play With Patterns

An intricate design gives guests a reason to notice this front door mat. A mat’s design can also pull together all the elements of a porch, such as the front door, mailbox, planted blooms and exterior paint.

“I chose the mat because it is fun, colorful, and it accentuated the colors of the house and the plants,” says Shirin Sarikhani, the owner of Staged to Sell and Design in Seattle.

Keep It Natural

If the entry is already bursting with details, such as eye-catching hardware and light fixtures, a neutral mat will help keep the attention on them. Natural doesn’t have to mean boring.

Welcome Mat 6: Grandin Road, original photo on Houzz

Personalize the Space

This contemporary monogrammed mat is hard to miss. “Don’t be afraid to choose a doormat with personality, says Kate Beebe of Grandin Road. “Work some wit and whimsy into your entrance, and choose something that will put a smile on your guests’ faces.”

She also recommends picking a mat that covers at least three-quarters of the entrance’s width and allows the door to open easily.

Change With the Seasons

While you are changing the front porch decor, swap a plain doormat for a festive option.

After the holidays, clean off your seasonal doormat and store it until the following year.

Match Materials

Doormats come in many materials, including ones that mimic entryway hardware. A rubber mat offers the wrought iron look without the weight and expense of the real material.

The punched-out spaces in a rubber mat also catch a lot of little pebbles, which can then be easily swept away with a broom.

Make It Feel Like Home

Doormat options are pretty much endless, so it shouldn’t be hard to find one that works for you.

By Brenna Malmberg, Houzz

The post How to Step Up Your Entry Design With a New Welcome Mat appeared first on Best Real Estate Agents in Northern Colorado.

Holiday Décor Trend: White-on-White Luxe

From a stunning mantel display to an elegant table setting, you can capture the magic of the holiday season in festive touches that are certain to make your home even more merry and memorable. The white-on-white design trend is definitely at the top of most luxury designers’ lists these days, and this extends to Christmas décor, as well. For some stylish inspiration, take a cue from these beautiful holiday decorating ideas.

table-dressing

This year it’s all about seasonal glamour, metallic flourishes meet elegant finishes for a luxury look to perfectly complement Christmas time at home.

gold-silver-white

Metallic decor is very popular for decor today because it’s stylish and gives a refined and elegant touch to any space. Silver and gold are the most used shades but copper has become a leader recently because of its soft and warm shade.

copper-and-white

White and gold décor can be bland without a deeper anchor color. Black accents lay low while bringing out the brightness of the white and metallic accents.

white-and-gold-2

A huge part of the white on white decorating trend this year is the flocked Christmas tree.

holiday-home-tour-monika-hibbs-1

If you are feeling devoid of color, adding a small amount of red to a flocked tree makes a huge impact.

red-and-white-and-silver

A light touch of pastel blue gives a softer impact while evoking the feeling of Christmas at Tiffanys.

05-aqua-blue-silver-and-white-christmas-decor

With all this white on white minimalism, you might start to feel a little snow blind – or simply bored. Another trend on the horizon is blue and green, inspired by the favored Peacock décor from the Victorian era.

28-white-stockings-an-ornament-garlands-of-various-shades-of-blue-and-green

The vivid colors are stunning on a white tree and blends very well with metallic accents in the home.

matching-colors-1

So what do the experts advise for decorating a tree? Here are a few tips to help guide you:

When in doubt, go for more lights. Nothing beats a well-lit tree.

Take a break and step away from the tree. It never hurts to revisit an hour later. You can often make just the right tweaks when you come back and look at something with a new set of eyes.

Don’t take decorating your tree too seriously. It is a tradition and is meant to evoke memories. Showcase your personality with your favorite ornaments and have fun with it.

Do what you love. You can be as creative as you want with your Christmas tree, so decorate it with whatever you’re into; shells, birds, or anything else. Just because you’re trimming a tree doesn’t mean you have to incorporate traditional standards.

The post Holiday Décor Trend: White-on-White Luxe appeared first on Best Real Estate Agents in Northern Colorado.

Make Your Home Safe for the Holidays

With all the cheer and celebration this time of year, it’s hard to believe anything bad could happen. However, statistics show there’s a significant increase in home-related accidents, fires, and burglaries around the holidays. To protect your family, friends and property, heed these six suggestions:

  1. Keep walkways, driveways and decks free of slippery ice or moss.
  2. Have your fireplace professionally cleaned, and only use one artificial log at a time.
  3. Check the batteries in all smoke detectors and make sure a working fire extinguisher is located on every floor, as well as the kitchen and garage.
  4. Snuff out any candles before leaving the room (even for a short while), and make sure to always keep them in short holders with wide bases so they don’t fall over.
  5. For holiday lights: Only use outdoor lights / extension cords in the outdoors, and plug them into GFCI protected outlets; make sure all lights are UL-approved; know that the smaller bulbs are safer; never leave them on when you’re not home.
  6. Plug a few lamps and the TV or stereo into timers to make it appear someone is home while you’re away. Also, ask a neighbor to park their car in your driveway, pick up any mail and keep an eye out for any suspicious activity.

Making the extra effort to keep your home safe will always be the best gift you could give family, friends and other visitors.

The post Make Your Home Safe for the Holidays appeared first on Best Real Estate Agents in Northern Colorado.

10 Projects to Start at Home Over a Holiday Weekend

Putting photos into albums, tidying your closet, making holiday gifts — a long holiday weekend can be the perfect time to tackle a project you’ve been wanting to get to but just haven’t had time for. Here are 10 ideas for home projects that are doable over a long weekend, from changing a light fixture to framing a treasured family recipe.

Home Projects 1: Titan Homes, original photo on Houzz

1. Make a meaningful display. The walls in this dining room feature framed recipes from the homeowner’s grandmother, hung alongside treasured family heirloom serving dishes and other favorite pieces. Create your own meaningful display for the holidays and beyond by framing a favorite family recipe (handwritten is best!) or collection of china. For a twist on this idea, try decoupaging a handwritten recipe (use a photocopy if you want to preserve the original) onto a plate or platter to create a unique and personal art piece.

2. Poll family and friends about a decorating or renovation decision you’ve been waffling on. Trying to choose the right paint color, upholstery fabric or kitchen tile? Use the holiday weekend as an opportunity to poll the family and friends who come over — even if you don’t agree with their preferences, it can help you figure out what you do want!

Home Projects 2: Sophie Sarfati, original photo on Houzz

3. Make a handmade holiday gift in multiples. If you’d like to try your hand at homemade gifts this year, it can be tempting to choose a different craft for each person on your list — but this can be a recipe for disaster as the days count down to Christmas and half your list remains unfinished. To maximize your time (and the cost of tools and materials) think up a project that’s easily repeated, and gift a version of it to multiple people. The mugs shown here would make a great project: Take plain store-bought cups and personalize them with handwritten messages in permanent marker.

4. Try the KonMari method of tidying. By now you’ve probably read (or at least heard of) the phenomenally popular book on decluttering, The Life-Changing Magic of Tidying Up: The Japanese Art of Decluttering and Organizing, by Marie Kondo. Use the long weekend as an opportunity to try out her method of decluttering your home, starting with your clothes.

Home Projects 3: H2 Design + Build, original photo on Houzz

5. Decide on a new light fixture or two. New lighting can completely transform the look and feel of a space. Having a light fixture replaced is usually a quick and easy job — an electrician can typically get it done in about an hour, more if you’re relocating the fixture or if you want to add a light where none currently exists. Try replacing your old dining room fixture with a beautiful pendant light or pair of lanterns, or change out the row of lights above your kitchen island.

6. Finally put loose photos in albums. Dig out a box of photos you haven’t gotten around to sorting, have a stack of blank albums at the ready, and hold a photo-organizing session solo or with family. To get through a lot of photos in a single afternoon, keep your albums simple, with just a few notes about the people and places featured.

Home Projects 4: rigby & mac, original photo on Houzz

7. Sort through baby clothes to make a memory quilt. Even if you’re not a quilter yourself, you can hire someone locally to use the fabric you provide to create a one-of-a-kind keepsake quilt. Sift through all those boxes and bins of saved baby clothes and pull out the most meaningful and lovely pieces to include in the quilt — just imagine how wonderful it would be to enjoy using those sweet little clothes again, instead of hiding them away in a box!

8. Put up picture shelves. If putting up a gallery wall of artwork has you feeling overwhelmed, take a different approach and install a row of picture shelves instead. The horizontal lines give the display structure, so you can mix and match sizes and shapes of frames as much as you wish — and with picture shelves, you can swap out your artwork whenever the mood strikes, without measuring or adding nail holes.

Home Projects 5: Traditional Bathroom, original photo on Houzz

9. Repaint the bathroom. Typically the smallest room in the house, the bathroom or powder room also tends to have very little wall space thanks to the tile and fixtures, which makes it a quick room to make over with paint. If you’ve been living with a plain white or builder’s beige bathroom, why not try a paint color with a bit more oomph? Slate, charcoal, mocha and silvery green are all elegant choices for the bath.

10. Put new planters on the front porch. Add fresh greenery to your entrance with a pair of matching topiary flanking the front door. If your region experiences cold winters, choose evergreen plants that can stand up to the weather, like boxwood or juniper. This simple change is a sure way to boost curb appeal and make your home look more inviting.

By Laura Gaskill, Houzz

The post 10 Projects to Start at Home Over a Holiday Weekend appeared first on Best Real Estate Agents in Northern Colorado.

Ten Ideas for New Thanksgiving Traditions

Most of us already have our “ways” of doing Thanksgiving – ways our mother did it, ways our extended family did it, ways our neighborhood did it. Thanksgiving doesn’t lend itself well to trying out new traditions, but sometimes the situation calls for it – you can’t make it home for Thanksgiving, for example, or you have a family now and want to start traditions of your own. So what can you do to heighten, deepen, and extend Thanksgiving to its most memorable end?

  1. Start the day with an indulgent, relaxing breakfast.

While some people are firmly in the “no breakfast” camp to save room for the big meal later, we love the idea of starting the day in such a festive, delicious way! Pancakes, waffles, eggs, even pie – it’s all good.

  1. Take time for yourself before time with family.

As wonderful as Thanksgiving can be, we all know it can be exhausting and overwhelming. That’s why it’s such a good idea to deliberately take a little time for yourself during the day to make sure you enjoy the holiday on your terms.

  1. Remember loved ones who have passed.

Holidays can be bittersweet when beloved family members or friends are missing from the gathering. Look through old photo albums and recall funny, tender or important achievements of those who are gone but not forgotten.

  1. Write your thanks on a butcher paper tablecloth.

Cover the table with butcher paper. During the meal, distribute pens and ask each family member to write down a few things they’re thankful for on the paper and then take turns reading them out loud. We love the practice during the Thanksgiving meal of naming things you’re thankful for, and this is a unique way to do it – especially since you can tear off and save particularly meaningful memories.

  1. Let everyone toast!

Another way to make gratitude gushing even more festive is to let everyone make a toast. Raise your glass to the year, to your family, to your friends!

  1. Have the kids serve dessert.

Let the bigger kids get in on the action of serving to their family.  Put them in charge of delivering dessert and coffee after the meal. The oldest can plate and pour while the younger kids can take orders and serve. It keeps them busy after the meal while the adults talk and gives them a broader sense of appreciation for the holiday.

  1. Have Thanksgiving dinner early.

Planning for a 3 p.m. dinner shifts the momentum of the day. An earlier meal creates a more relaxed celebration, plus there’s plenty of time to digest before going to bed.  An earlier dinner also accommodates traveling guests and lets them return home at a reasonable hour.

  1. Take a long walk together after dinner.

No one is ready for dessert right after dinner anyway, so why not take that time to go on a long walk with your loved ones? Enjoy the cool, crispy (and hopefully dry) autumn weather and get the blood flowing again after all that rich food.

  1. If it’s just two of you, really treat yourself.

It can be hard to justify making a huge Thanksgiving meal when it’s just two of you, but that doesn’t mean it has to be any less special, or even any less of a treat. In fact, it should be more so. Make it special by treating yourselves to nicer ingredients and better wine than you would normally use if you were cooking for a large group.

  1. Stay connected with family members far away.

If you can’t be with your loved ones on Thanksgiving, thankfully you can still be together – just virtually! Do a video call or Google Hangout before dinner, or Facetime family members in for the giving-thanks portion of the evening.

This article originally appeared on WindermereSeattle.com 

The post Ten Ideas for New Thanksgiving Traditions appeared first on Best Real Estate Agents in Northern Colorado.

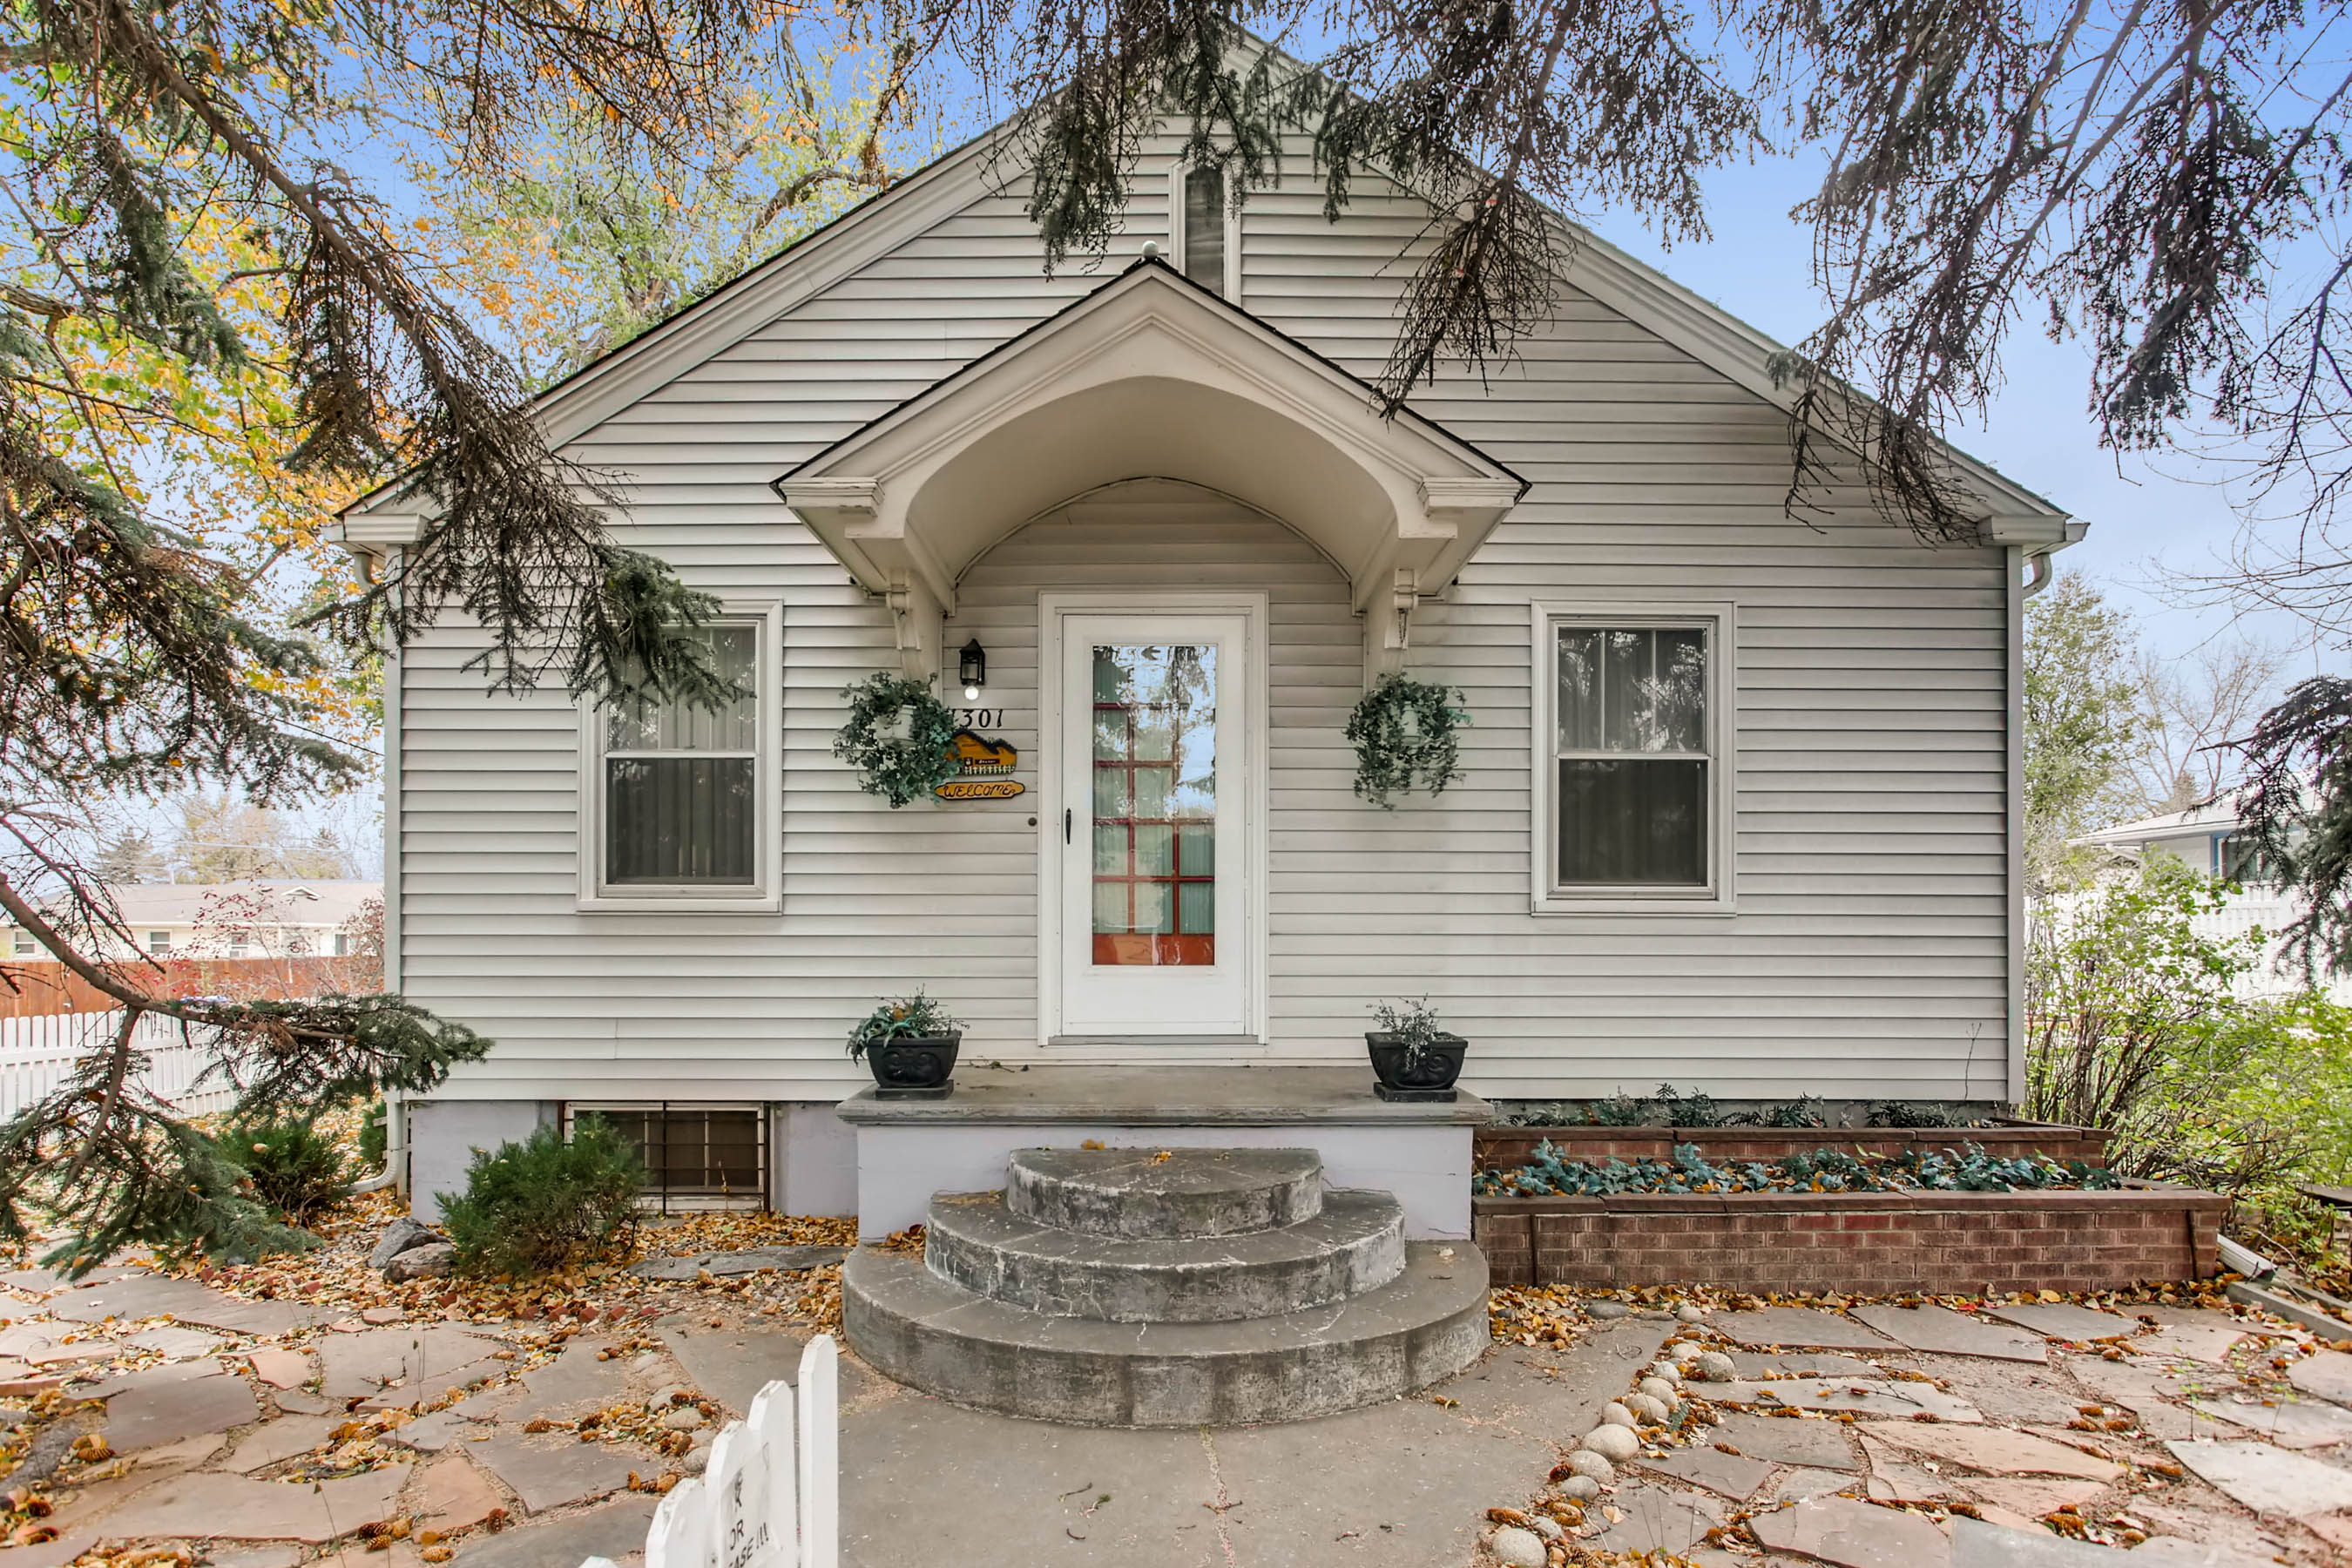
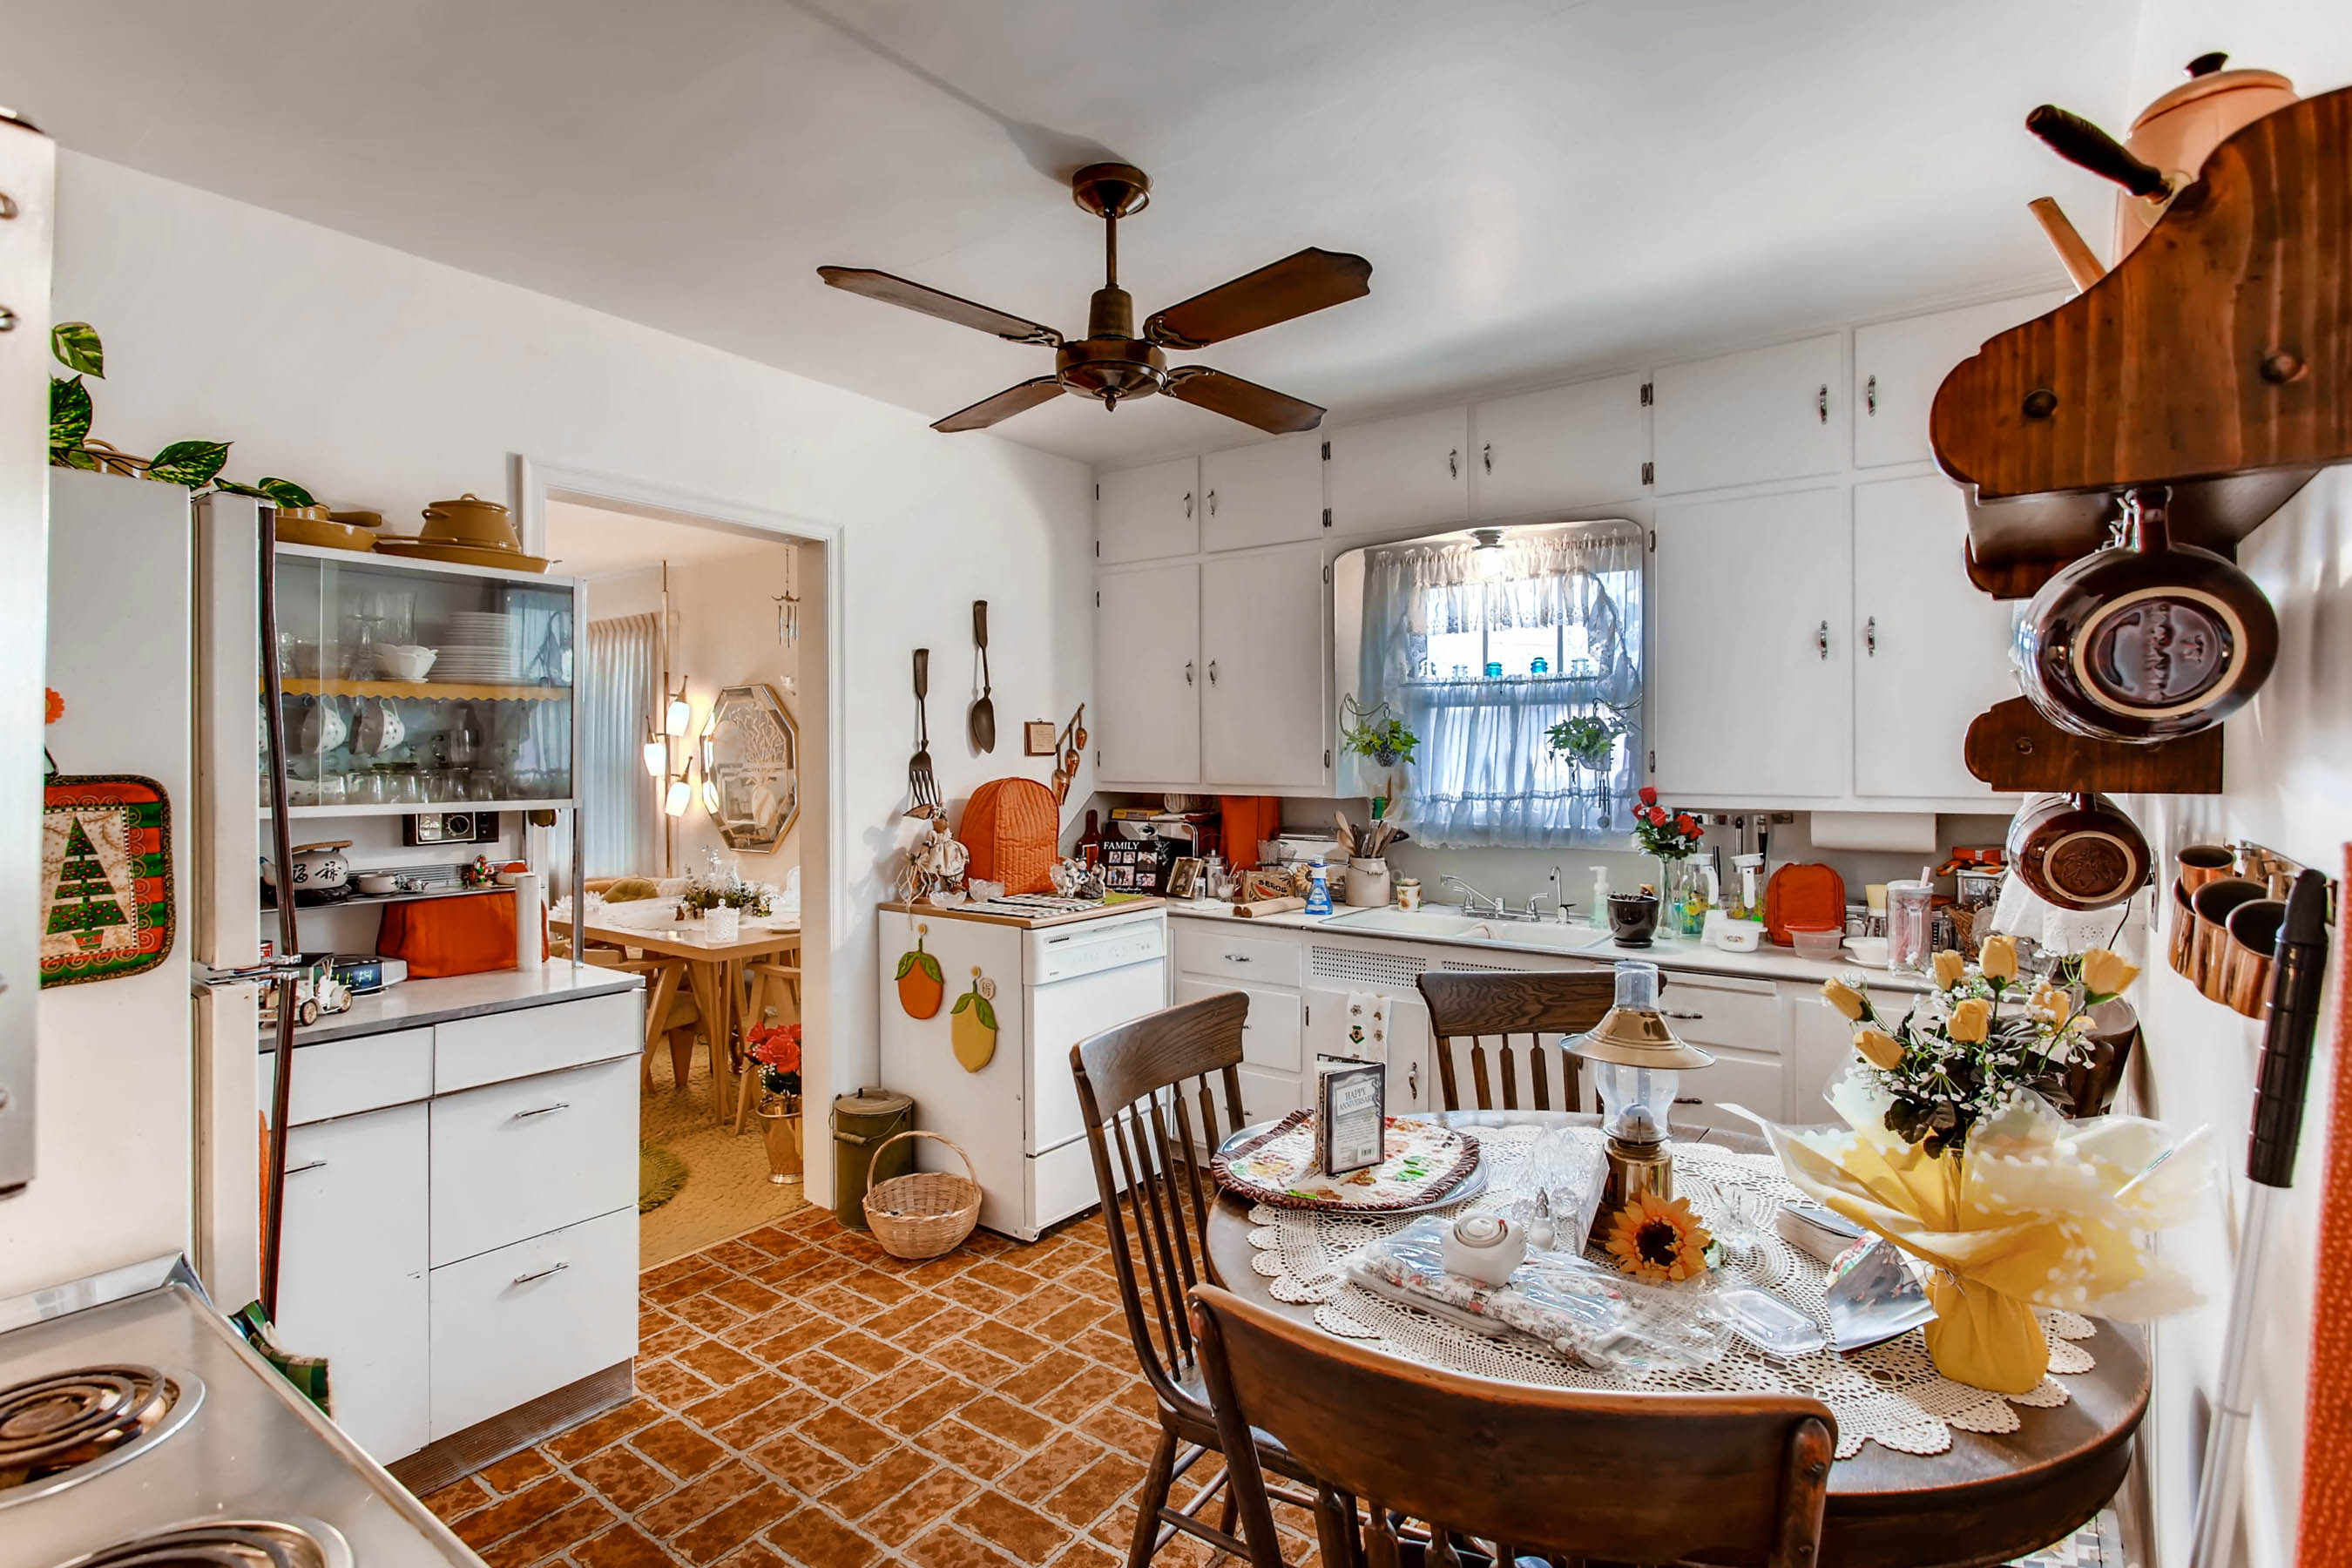
Spacious Cottage With Vintage Charm

Featuring 3 Bedrooms, 2 Bathrooms And A Finished Basement!

Your chance to own a home that sits on 3 lots in the heart of downtown Loveland! This home has vintage charm and character with a finished lower level complete with kitchenette. Hardwood floors under carpet on main level. Basement bedrooms nonconforming. Fully fenced lot with detached 2-car garage, separate shop and two additional storage sheds. Zoned R3E-High Density. Newer roof, A/C and furnace. No HOA. Just minutes from downtown Loveland restaurants, shops and Chilson Center.

For more information, please visit: http://windermerenoco.com/listing/71712340 or call Kelly Swift at (970) 460-3033.


The post Spacious Cottage With Vintage Charm appeared first on Best Real Estate Agents in Northern Colorado.

How to Live Through a Home Remodel

If you’re thinking about remodeling or are about to break ground on your first renovation, odds are you probably know a bit about how the project is going to go. After all, you’ve watched a few TV shows, your cousin’s husband is a general contractor and the guy you sit close to at work tells you every detail of how his wet bar is coming together. So you pretty much know all there is to know, right? Not so fast.

Live Remodel 1: JLB Property Developments, original photo on Houzz

As much as you may be able to glean from friends and family, articles and TV, there’s no experience quite like personally getting down into the dirt (more on this later) of a remodel. And what you don’t often hear about are the harsh realities of wading through such a detailed, often stressful project.

We’ve written before about how remodeling a home is the ultimate litmus test for your relationship. And that’s why I think understanding a few of the common negative things that happen during remodel is a vital component of being prepared.

I’ve not only braved a few remodels myself, but I’ve worked on the other end as a general contractor, and while I can’t claim I know everything, I do think I have a lot to share. Here are a few things you should know about what it’s really like to live through a renovation.

Related: How to Survive the ‘Punch List’ Phase of a Remodel

Live Remodel 2: Turnbull Griffin Haesloop, original photo on Houzz

It Will Upset Your Daily Schedule

Say, for example, every day before you leave for work you like to brew a cup of tea, settle in with your tablet at your breakfast nook and prepare for the day by going through your emails.

Now picture this exact routine while your kitchen and breakfast nook is under construction. The peace and tranquility (and cleanliness!) of your morning retreat is no more.

You may have to alter your daily routine a bit by finding a coffee shop near your house where you can relax, or by relocating to your bedroom for your beloved cup of chai.

Creatures of habit, be warned: You may have to (take a deep breath here) change a couple of your habits while your remodel is going on.

Related: Remodeling Your Kitchen? Move Your Coffee Station to Your Living Room

Contractors often like to take up shop (if permitted) in garages, as they are often places where they can make a bit more of a mess and noise while remaining close to the job site. If you want certain parts of your home, yard or garage to remain sacred, talk with your contractor about areas where work can and cannot occur.

Live Remodel 3: Kasper Custom Remodeling, LLC, original photo on Houzz

There Will Be Dust

This one may be a no-brainer to some and a shock to others (again, take a deep breath). Some contractors will give hints that the project will get dusty, such as: “We will take measures to put up dust barriers around the area of the remodel” or “we will keep a broom and dustpan on site at all times.”

But no matter how many protective products are put up, there are certain stages of construction that can get intense (for example, sanding down drywall). Not only does dust get thrown into the air while work is going on, but it stays floating around in the air for a while afterward. And floating dust’s favorite pastime is, regrettably, travel.

It may travel to different areas of the house, settling into your dog’s bed, onto your kitchen counters and even into your lungs. You may be thinking, “So what? I breathe dust all the time. That’s just life.” This is true, but the dust you’re usually inhaling is dirt and dead skin cells and other organic stuff. Remodeling dust can be made of not-so-nice things such as chemicals found in paint, fiberglass insulation or cement.

Have a conversation with your contractor to see whether he or she plans on using an air scrubber during your remodel as well as dust barriers and traditional cleaning. This combined system helps to prevent dust from traveling, and it also takes a lot of the nasty particulate out of the air before it has time to invade other areas of your house.

While most contractors genuinely work to keep your home clean, safe and comfortable during a remodel, sometimes dust control isn’t a top priority. It will quickly become front and center in your home, though, if it isn’t properly managed from the start.

Related: Bathroom Renovation? Get Ready for the Day in Peace With a Bedroom Vanity

Live Remodel 4: studiovert design, original photo on Houzz

It Can Be an Emotional Roller Coaster

Every person handles stress and emotions differently, but the fact is that having a bunch of unfamiliar faces tear your house apart before your very eyes is stressful. I know that sounds like a bit of hyperbole, but when you’re actually living through a remodel, that’s exactly how it feels.

It can be tough to keep your head on straight when you’re trying to make selections for tile and lighting fixtures that suit your budget while simultaneously worrying about whether the project will end on time. Add family and work life to that? Yikes.

Now that I’ve worked you up, let me provide some peace of mind: Contractors know what they are doing. They will do everything they can to make sure you are happy with your home and the job is completed in a timely manner. Your local YMCA provides yoga classes, which can be very helpful with managing stress. Feeling better?

Accept that you will feel some stress and some emotions, and allow yourself to be OK with that. It’s a part of the process. Freaking out about the fact that you’re freaking out will only make things, well, freakier.

Live Remodel 5: Amanda Armstrong Sava, original photo on Houzz

Now that I’ve shaken up any romanticized beliefs you may have held about remodeling, let me instill a bit of faith by saying that it’s not all bad. Remodeling can actually be quite pain-free, in fact, if you communicate. I know I’ve harped on this before, but I can’t stress the importance of it enough. Talk with your contractor before work starts about things such as scheduling, dust control and communication preferences. It makes a world and a half of difference.

So, yes, there will be dust, and yes, you might get tired of seeing your project manager every day, but there will be days when you come home after work and see new countertops being installed, and it will stop you dead in your tracks because — whoa — those look great!

Other times you might have the house to yourself for a second and you can poke around to “ooh” and “ahh” over all of the new, shiny things filling your beloved home. So not only is it not all bad, some of it is actually pretty good. So good, in fact, that you might even start thinking about your next project before the first one even ends.

By Hannah Kasper, Houzz

The post How to Live Through a Home Remodel appeared first on Best Real Estate Agents in Northern Colorado.

The Most Important Marketing Choice When Selling Your Home: The Price

There is often a temptation for sellers to overprice their home, but Windermere agent, John McKenna, shares why that is a big mistake. Get insight into the psychology of the home buyer and how to find a real estate agent that understands the science of pricing your home.

The post The Most Important Marketing Choice When Selling Your Home: The Price appeared first on Best Real Estate Agents in Northern Colorado.

6 Plumbing Hacks for Tiny Homes

Small spaces can drive you crazy, especially if you need pipes in a compact bathroom, kitchen or laundry to run toilets, sinks and washing machines. Here are some must-know tips and tricks for your home’s high-traffic rooms to free up space for features and fixtures that need plumbing.

Plumbing Hacks 1: eat.bathe.live, original photo on Houzz

1. Tinker with the toilet. Many decorators will have ideas about how to create the illusion of space in a small room or house, but the trick is to free up space. And most of the time, the busiest and most-used rooms in the house — the bathroom, laundry and kitchen — are the best rooms to start with.

If you find your fixtures take up too much space, slim them down or get rid of them altogether. A wall-hung toilet with a concealed tank, for example, saves precious capacity in the smallest room in the house. The tank sits in the wall and the buttons and bowl are all you can see. Be aware, though, that concealed tanks can pose an access problem for your plumber and one day that tank will need maintenance and, eventually, replacement.

Pro tips: Hide an access panel, or position the tank where the wall it backs onto is a closet or cabinet, and buy only well-known brands so replacement parts are easily found.

A close-coupled, back-to-wall toilet, where the tank and bowl sit flush — excuse the pun — against the wall, can be a good, more affordable compromise.

You may also consider an integrated toilet with a sink on top. This is a great option if you’re looking to reduce water usage and become environmentally friendlier. It could be just what you need: a sink where the wastewater from washing your hands runs into the tank for the next flush, and you save space because you don’t need a separate sink.

Hiding the tank in a setup like this streamlines the room and creates counter space — a luxury in a tiny bathroom. Connecting the sink wastewater to the tank is also an option in this integrated design.

Plumbing Hacks 2: Sarah Blacker Architect, original photo on Houzz

2. Bath or shower? Why not both? Some bathrooms feature a separate bath and shower, but if you’re short on space, consider getting rid of the bath altogether to create more space, or even combining the two in a shower tub. Modern inset bath designs are slender so you can gain space while still keeping a tub.

Pro tip: If you’re not crazy about the look of a built-in bath-shower, consider a back-to-wall bath design. It has the same style as a free-standing bath on the side facing the open bathroom, but it fits snugly against one wall (or two) for ease of cleaning.

Another option to consider is a wet bathroom. The layout consists of a toilet and small sink with a shower overhead and a drain in the middle of the room. As the name implies, it means everything can (and usually does) get wet, but without a surround for your bath or shower you can really maximize space.

Related link: Make the Most of Your Bathroom With These Key Measurements 

If that’s not for you, a frameless glass screen to keep the water contained could be a great alternative. This is a practical option, but always remember to hire a professional to waterproof and tile the walls to prevent dampness from seeping in.

Plumbing Hacks 3: clim createur d’interieur, original photo on Houzz

3. Buy compact fixtures. Getting rid of bulky faucets in favor of compact fittings is a small job that can make a big difference, so don’t discount this method of slimming down your bathroom. Consider a side-mounted faucet, which combines hot and cold taps in one, but check the handle swing direction since this may negate the space saved. Or you can opt for wall-mounted mixers that allow the basin to be pushed back and have the no-gunk-around-the-bottom advantage.

The shower head can also come from the ceiling to accommodate a smaller recess.

Pro tip: If your shower walls are being rebuilt and tiled, have niches for your shampoo bottles built into the walls to keep your shower area looking sleek. Hide the niche out of view from the doorway because, more often than not, your shower gel, shampoo bottle and razor collection are not photo-shoot-ready.

Plumbing Hacks 4: Interbath, original photo on Houzz

4. Rethink your sink. Replacing a large laundry sink with a smaller kitchen-sized basin will gain you valuable extra counter and storage space.

Related link: Want More Advice Like This? Ask a Professional Plumber

Pro tip: Switch an indoor hot water tank that holds multiple gallons to a continuous-flow system, which is a small, wall-mounted unit.

A smart placement of features is another good way of gaining extra room. A sink in the corner of the kitchen will give you more prep space, for example.

Plumbing Hacks 5: Day Bukh Architects, original photo on Houzz

5. Off the counter, onto the wall. Wall-mount as many fixtures as possible to use vertical space and clear counter space. This goes for every room in the house.

In the bathroom, consider a sink rather than a full vanity, and build cabinets and shelves along the walls or install a mirror-fronted cabinet above the basin to compensate for the missing vanity storage. Some mirrored cabinets can also be recessed into the wall cavity behind. Accessories such as toothbrush holders and hair dryer docks can also be wall-mounted.

In the laundry, wall-mounting what you can will make doing the washing easier on your back and create a little more room underneath to stash linens, detergents and even your vacuum cleaner and other cleaning equipment.

You can wall-mount storage in every room. In the kitchen, for example, move appliances such as microwaves onto the wall and off your precious counter space. Install a wall-mounted magnetic strip for knives, and mount a paper towel holder onto the wall for easy access.

If you need every bit of space in a room, consider recessing your cabinets or shelving into the wall — the unused space under the stairs is the perfect opportunity for this, as is a wall cavity. If you need deeper storage and can take space from the adjoining room, that’s even better.

Plumbing Hacks 6: Whiting Architects, original photo on Houzz

6. Make more room for what matters. Ever noticed how much room doors take up? You need to keep a space clear to allow them to swing open, which can be a hard ask in a small bathroom. Consider switching the orientation of the door so it swings out of the bathroom, or install a sliding or pocket door.

This also goes for doors on showers, vanity units and medicine cabinets (which can also be recessed into the wall). Some people remove the doors to their kitchen and laundry rooms altogether to create a more open space. The more space you can create, the easier it is to install the fixtures (and storage) you want or need.

Related link: Keep Shower Supplies Tidy With a Chic Caddy

Pro tip: Light is an important element when it comes to creating a feeling of space. In addition to optimizing natural light from windows, install good overhead lighting. Consider skylights or translucent ceilings if the windows are too small in a bathroom or kitchen. Mirrors can be your best friend in creating the illusion of space by doubling the visual area and diffusing light around the room.

Whether you live in a tiny house or simply have small rooms in your home, being able to use what you have well is key to freeing up space. It doesn’t need to cost much to create the illusion of a bigger area, even in the smallest room in the house.

By Darren Clancy, Houzz

The post 6 Plumbing Hacks for Tiny Homes appeared first on Best Real Estate Agents in Northern Colorado.