4 Simple Steps to Painting a Wall Faster

Many books about painting will tell you to paint a small strip along the baseboards, doorways, trim and other edges of the room with a brush before breaking out the paint roller to paint the rest of the wall. But before you do this paintbrush work, called “cutting in,” consider paint expert Shauna Gallagher’s method: Roll paint on the wall and then use a paintbrush for the edge work. To learn more about this technique, watch as she paints the feature wall of a room.

Paint Faster 1: Houzz TV, original photo on Houzz

Watch a video tutorial here

Step 1: Add Paint to the Roller

With a paint roller in hand, Gallagher dips her roller cover into the paint and then rolls it down the cage in the bucket to remove excess paint. She recommends rolling down and not up to avoid splattering paint out of the bucket. If you have excess paint on the edge of the roller, use a chip brush to wipe it off so it doesn’t drip on the wall.

Paint Faster 2: Houzz TV, original photo on Houzz

Step 2: Roll on the Paint

In rolling the paint on the wall, Gallagher uses vertical movements — rolling up and down as she moves across the wall — so she can glide right up against the taped-off edges. The paper-and-tape combo, which she applied to the wall’s edges with a tape gun, gives her extra protection against getting paint on the ceiling and adjacent walls.

Because she is painting a smooth wall with a thin roller cover, she can get closer than if she were painting a textured wall with a fluffy roller. Additionally, she rolls horizontally along the ceiling line to get even closer with the roller. She says she can roll paint within about 1 inch of her taped-off edges. If she would have cut in first, she says she might have painted a strip of 5 to 6 inches with a paintbrush.

“You are looking at a huge time savings if you roll paint first,” she says. “It might be 1½ hours versus 25 minutes.”

As she rolls, she keeps the arm of the roller on the side of the direction she is traveling across the wall. She is going from left to right, so the arm is on her right side. She uses this method because a small line of paint forms on the edge, and she can pick up that extra paint and spread it out as she goes.

Keep a Hamper Nearby for Messy Rags

After she completes a section, Gallagher lightly goes over the wall again, this time rolling only downward, to remove any roller lines and give the paint an even finish.

Paint Faster 3: Houzz TV, original photo on Houzz

Step 3: Paint the Edges

Once you have rolled paint on as much of the wall as possible, fill in the unpainted areas with a paintbrush. Because she rolled paint close to the wall’s edges, Gallagher can make quicker work of the cutting-in step of her project.

For this step, she dips her paintbrush into the paint and then removes paint from one side of the brush by wiping it along the edge of the can. She uses this side of the brush as she paints along the taped edge. Applying less paint to the taped edge keeps the taped line crisper, she says, and prevents paint from squishing up into the corner.

Paint Faster 4: Houzz TV, original photo on Houzz

Step 4: Remove the Tape

After painting, Gallagher waits until the paint is just dry before methodically removing the tape. She recommends putting your hands close to the wall and pulling the tape at a 45-degree angle.

“When you are farther away, you are yanking on the tape a little more,” she says. Her technique helps keep paint from pulling away from the wall.

When you are done, you can step back and admire a wall that you painted in a fraction of time, thanks to the reverse method.

Next Up: How to Paint Kitchen Cabinets Like a Pro

By Brenna Malmberg, Houzz 

The post 4 Simple Steps to Painting a Wall Faster appeared first on Best Real Estate Agents in Northern Colorado.

9 Options to Remove, Hide or Play Down a Popcorn Ceiling

Don’t love your popcorn ceiling? You’re not the only one stuck with some unwanted stucco overhead. There are many options for moving on from it, but not all of them are equally effective — or equally easy. To help you decide how to address your popcorn problem, here are some top ways to remove, cover or distract from stucco ceilings.

Related: How to Decorate Your Ceiling

Popcorn Ceiling 1: The Kitchen Source, original photo on Houzz

From the 1950s to the 1980s, so-called popcorn ceilings (with their prickly stucco texture resembling the popular movie theater snack) were a major architectural staple in America and many other nations.

Eventually the asbestos commonly used in the application was found to be toxic, and demand severely dropped.

However, a textured ceiling does have its advantages. It reduces echoes and hides ceiling plane imperfections, which is why it’s still used (in asbestos-free formulations) today, as shown in the bathroom here.

Despite its practical uses, popcorn ceilings, for many people, are considered an unfashionable eyesore, especially with contemporary demand for “clean lines.” Also, popcorn ceilings can gather dust and be difficult to clean or repaint, which means they don’t always age beautifully.

But don’t worry. You’ve got plenty of options.

Popcorn Ceiling 2: Designs by Gia Interior Design, original photo on Houzz

Ceiling Scraping

The good news is a sprayed-on stucco coating can be scraped off to reveal the original ceiling surface, a process usually known simply as “ceiling scraping” or “stucco removal.” A specialist typically does this because (here’s the bad news) the process can be somewhat costly at around $1 to $2 per square foot. It’s a messy, labor-intensive process, hence the high cost.

Also, in some cases, the results may not achieve the crispness of a ceiling that had not been stuccoed in the first place, especially if the stucco has been painted over, which greatly complicates the removal process.

Even in the best cases the exposed ceiling will typically require at least some smoothing and patching to create a more even and crisp final product, which makes this an extensive and relatively challenging undertaking for DIYers.

While ceiling stucco no longer uses asbestos in modern applications, homes built before 1980 (or even in the early ’80s while old stucco products were still stocked) may include asbestos. If there is any doubt, a professional asbestos test should be conducted before any resurfacing, which could release heavily toxic dust.

Ceiling Replacement

One of the simplest alternatives to scraping is removing and replacing the ceiling drywall. Alternately, you can have the ceiling layered over with new drywall. The drop in the ceiling plane will often be minimal, and this method can encase asbestos rather than releasing it into the air, delaying the issue, if not resolving it.

Redrywalling a ceiling will cost closer to $4 to $6 per square foot, but the results will be more predictable.

Popcorn Ceiling 3: Diament Builders, original photo on Houzz

Covering Stucco

Speaking of layering, there are many other materials besides drywall that can be installed over a popcorn ceiling, many of which add extra personality to a room.

Related: Keep Your Cottage Cool

Beadboard. Classic beadboard makes a charming ceiling treatment, and not just in a rustic cottage. Painted white, the subtle texture of beadboard paneling works well in traditional spaces or modern ones, adding a layer of depth in an unconventional place.

Popcorn Ceiling 4: Spinnaker Development, original photo on Houzz

Panels of beadboard often cost less than 50 cents per square foot, making this a very affordable option, especially for handy DIYers.

For a contemporary twist, try finishing the ceiling in a gloss paint, as shown here. This slow-drying finish will take more labor to complete, but the results have incredible depth and elegance.

Warm wood. If you’re not into painted beadboard, try multitonal wood for a rich, inviting treatment that’s great for a den or sitting area. Contrast it with white molding and crossbeams, or let the wood speak for itself. This approach works well with rustic decor, as a gentle touch in a modernist space or somewhere in between.

Popcorn Ceiling 5: Bravehart Design Build, original photo on Houzz

Pressed tin. Whether you use true pressed tin tiles or a fiber substitute, this classic ceiling look recalls speak-easy style and makes a great cover-up for a kitchen ceiling. You can paint it white or pale gray to keep the look breezy, or an inky dark hue (like charcoal or navy) for moody atmosphere. Or choose a metallic finish for extra sheen and drama.

Many companies now provide faux pressed tin and other panel systems specifically designed to cover stuccoed or damaged ceilings. They typically cost $1 to $5 per square foot.

To have a professional install these materials for you, expect to pay several hundred dollars extra.

Popcorn Ceiling 6: The Morson Collection, original photo on Houzz

Other Options

Lighting. Sometimes the best way to deal with ceiling stucco is to de-emphasize it, and smart lighting choices can go a long way toward that.

Notice how the lighting hitting this stucco wall emphasizes the texture. Great when the effect is desired. To avoid highlighting unwanted ceiling stucco, choose lights that aim downward, rather than upward or outward, so light is cast on beautiful surfaces below and not on your ceiling itself.

Try pot lights, or semi-flush-mounts (or pendants) with an opaque shade to aim light downward rather than multiple directions.

Paint. Ultimately, the best way to deal with a popcorn ceiling may simply be to learn to live with it. Think about it: How many people do you know who live with popcorn ceilings? I bet you can’t specifically remember who has it or doesn’t, because unless a ceiling is highlighted, we don’t typically spend much time looking at it.

Try painting the walls and the ceiling the same color to blur the lines between them, and then create drama at ground level to draw the eye down. You’ll soon forget about your stucco altogether.

By Yanic Simard, Houzz

The post 9 Options to Remove, Hide or Play Down a Popcorn Ceiling appeared first on Best Real Estate Agents in Northern Colorado.

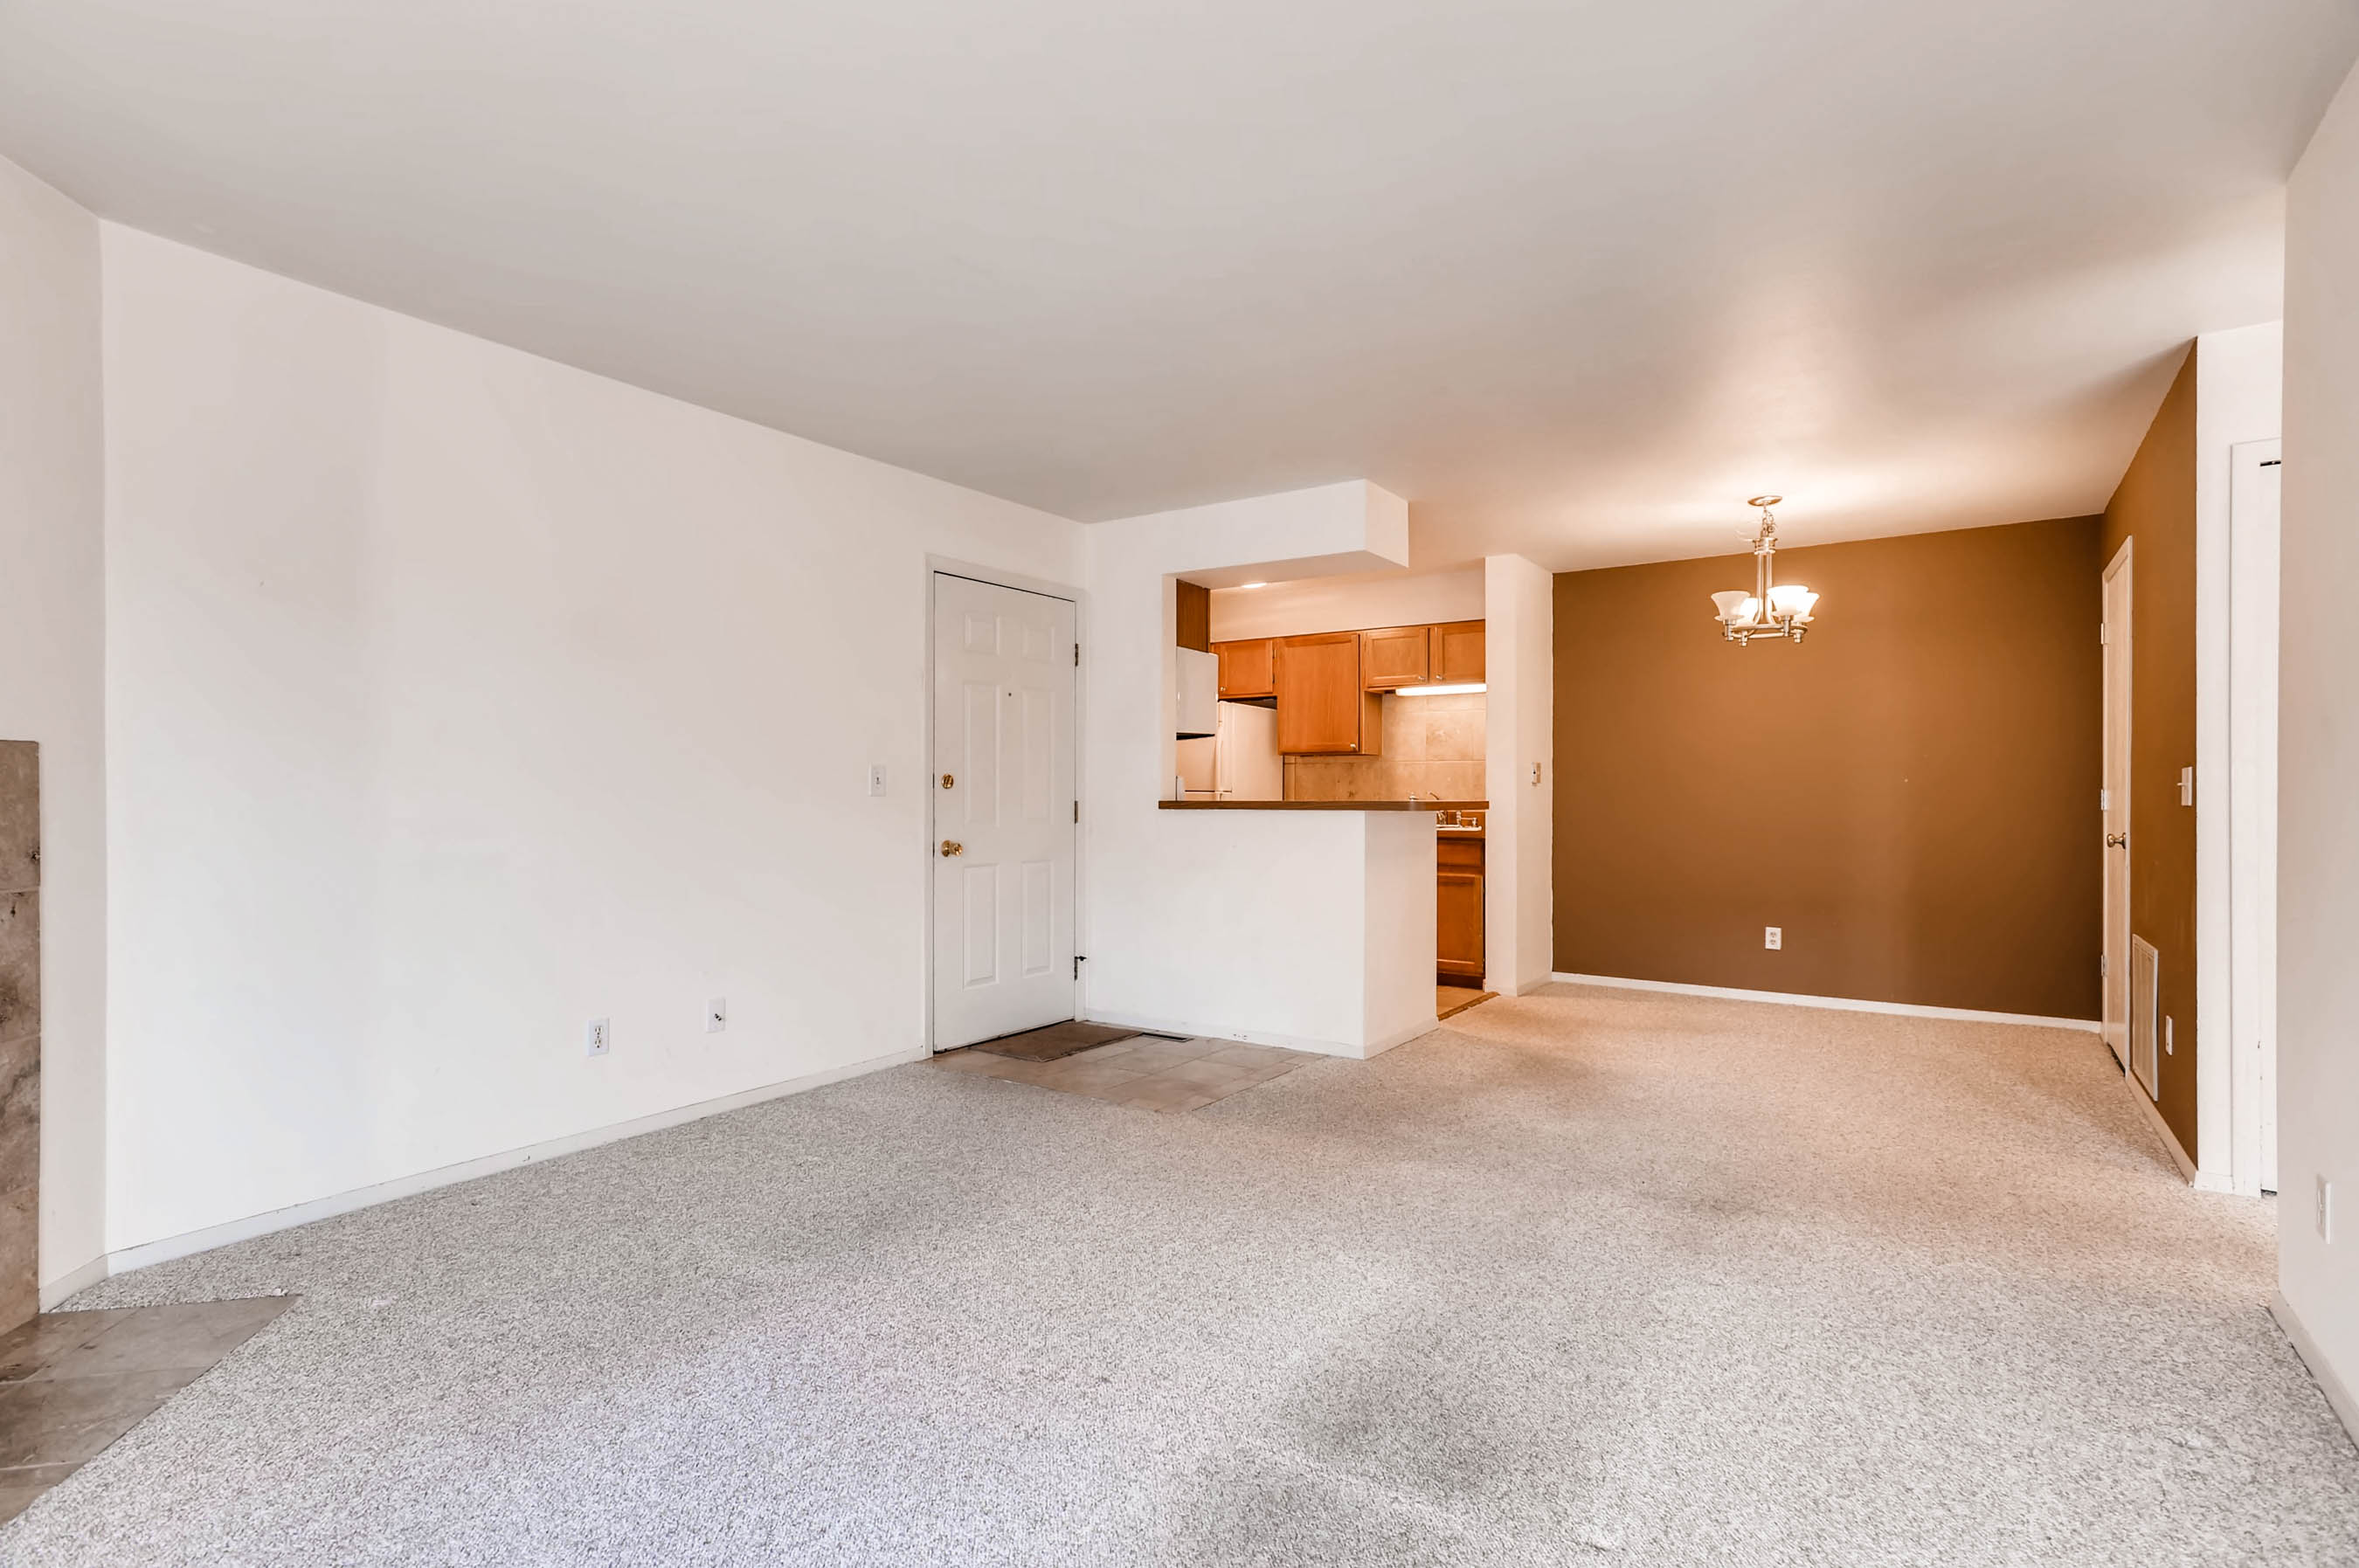
Top Floor Condo In A Superb Location

Featuring 1 Bedroom, 1 Bathroom And An Open Floor Plan!

Top floor condo located minutes from downtown, CU campus and within walking distance of Celestial Seasonings, trails, several parks as well as a dog park. This 1bed/1bath offers great views of the mountains on your private balcony with storage closet. Open floor plan, walk-in closet, newer appliances and a washer/dryer. 1 reserved carport and 1 reserved parking space. HOA includes pool, tennis and clubhouse. Carpets have been cleaned since photos were taken.

For more information, please visit: http://windermerenoco.com/listing/71950307 or call Kyle Basnar at (970) 460-3033.


The post Top Floor Condo In A Superb Location appeared first on Best Real Estate Agents in Northern Colorado.

5 Mid-century Modern Homes That Make the Most of Their Small Design

Mid-century modern homes were small out of necessity. Money was in short supply after World War II, so architects and builders had to keep houses compact yet functional to stay within homeowners’ budgets. At the same time, lifestyles were changing. Smart architects took on a new approach and designed homes with an open feel, which differed greatly from the boxy designs of the previous era.

Related: Why You Should Embrace Your Midcentury Modern Kitchen

Midcentury Modern 1: Flavin Architects, original photo on Houzz

I’ve been enamored with midcentury modern homes since my childhood in California, where I was privileged to spend time in the intimate houses designed by Frank Lloyd Wright apprentice Mark Mills. Mills was the on-site architect for Wright’s famous Walker House, or Cabin on the Rocks, in Carmel, California, pictured. It was during this time that Mills learned an important lesson from Wright: Reject a larger house in favor of a modest home with flowing spaces and no excess.

The following ideas show how midcentury modern homes beautifully make the most of their space in ways that can easily be incorporated in homes today.

Midcentury Modern 2: Wheeler Kearns Architects, original photo on Houzz

1. Open floor plan.

Above all else, the open floor plan is the defining characteristic of midcentury modern homes. Closed-off rooms gave way to flowing spaces that strung one room to the next to form fluid kitchen, living and dining areas.

In a small home, the key to making the open floor plan work is to understand which rooms need privacy, and when. Of course, bedrooms and bathrooms need separation from the main areas of the home, but it’s also good to consider other areas that need privacy: for example, a study where a parent can work without interruption while the kids play nearby.

In this lake house by Wheeler Kearns Architects, the common areas are located in a centralized area, while the more private areas are off to the side or tucked away on another level.

Midcentury Modern 3: Balodemas Architects, original photo on Houzz

2. Expanded sightlines.

The tendency of midcentury modern homes to have open floor plans speaks to the elegant details often seen within these houses. Without trying to be too sparse, midcentury designers included functional details in their homes that were as uncomplicated as they were beautiful. Finding the balance between sophistication and openness was in the hands of the architect.

Take, for example, the stairs in midcentury modern homes. In this remodel of a midcentury home by Balodemas Architects, they preserved much of the original stair and design. The riser, or the vertical part that connects the stair treads, was simply left out for a lighter appearance. The stair was no longer in a hall but fully opened up and integrated into a room. Walls were often dispensed with entirely. Instead, partial-height screens inspired by Japanese shoji were used to subtly separate spaces.

Midcentury Modern 4: Steinbomer, Bramwell & Vrazel Architects, original photo on Houzz

3. An instance to avoid “open.”

While photographs of midcentury modern homes often feature great walls of glass, what’s often not shown, perhaps because they are not as photogenic, are the equally generous opaque walls.

These walls are key to the home’s aesthetic success. They provide a protective backing to the composition, since the opaque side of the home often faces the road, as with this house by Steinbomer, Bramwell & Vrazel Architects. Although the back of the house is open, with lots of glass and a sense of ease between inside and out, the street-facing side would never give that away. An opaque wall creates a boundary to the outside world while extending the perceived size of the home. Walls of glass are expensive, so opaque walls are also an economical design move.

Midcentury Modern 5: Flavin Architects, original photo on Houzz

4. Everything in its place.

Thoughtful storage is a another key aspect of what makes a small mid-century home completely livable. Most mid-century modern homes, particularly those on the West Coast, had no basements or attics, so storage closets needed to be located among the main living spaces. In part, the answer was to do more with less by having well-designed storage throughout and daily items close at hand, as in this kitchen. This has to be married to an ethic of keeping only what you need and having periodic yard sales.

Midcentury Modern 6: Koch Architects, Inc. Joanee Koch, original photo on Houzz

5. Display with a purpose.

In a small home with innovative but limited storage, it’s important to have display areas for the pieces that don’t need to be tucked away in drawers or closets. This was done beautifully in mid-century modern homes by integrating display areas as a means of aiding with the potential conundrum of scarce storage.

This restoration by Koch Architects shows this exact notion at work. Every other step in the stair has an integrated bookshelf. This would make a perfect rotating library with a range of titles easily seen while ascending the stair.

By Colin Flavin, Houzz

The post 5 Mid-century Modern Homes That Make the Most of Their Small Design appeared first on Best Real Estate Agents in Northern Colorado.

How to Step Up Your Entry Design With a New Welcome Mat

Right before the guests ring the doorbell or give the front door an old-fashioned knock, they step on your welcome mat. This mat serves two purposes: catching debris and adding style. Here are some ideas for how to give this entry detail a refresh before the hustle and bustle of the holiday season begin.

Welcome Mat 1: Caela McKeever, original photo on Houzz

Say Hello

A lettered mat can help you say exactly what you want to say when someone comes to your door. Obviously nothing says hello more than the word “hello.”

The simple greeting might also draw visitors’ eyes to the ground and remind them to take off their shoes before they step inside.

Coordinate Colors

If you have a colorful front door, use that as doormat inspiration. If your door lacks color, maybe it’s time to paint it.

Door paint: Scarlet Ribbons, Dulux

Welcome Mat 2: Zack | de Vito Architecture + Construction, original photo on Houzz

The whole mat doesn’t need to match the door. This striped mat draws on other colors found on the home’s exterior.

Welcome Mat 3: Rustic Porch, original photo on Houzz

Think Outside the Rectangle

Many front doors feature rectangular doormats, but other options exist. The semicircle mat in the photo works nicely with the rustic rockers, porch swing and shutters.

Welcome Mat 4: Garrison Hullinger Interior Design Inc., original photo on Houzz

Roll Out a Rug

A big, bold rug in front of the door adds color and life to this home’s entry, designed by Garrison Hullinger.

A large porch rug can also make the space feel like another room of the house. If you add a few chairs, people can stop, relax and enjoy the outdoors. Plus, more rug means more chances for it to pick up any water or dirt from the shoes of incoming guests.

Welcome Mat 5: Seattle Staged to Sell and Design LLC, original photo on Houzz

Play With Patterns

An intricate design gives guests a reason to notice this front door mat. A mat’s design can also pull together all the elements of a porch, such as the front door, mailbox, planted blooms and exterior paint.

“I chose the mat because it is fun, colorful, and it accentuated the colors of the house and the plants,” says Shirin Sarikhani, the owner of Staged to Sell and Design in Seattle.

Keep It Natural

If the entry is already bursting with details, such as eye-catching hardware and light fixtures, a neutral mat will help keep the attention on them. Natural doesn’t have to mean boring.

Welcome Mat 6: Grandin Road, original photo on Houzz

Personalize the Space

This contemporary monogrammed mat is hard to miss. “Don’t be afraid to choose a doormat with personality, says Kate Beebe of Grandin Road. “Work some wit and whimsy into your entrance, and choose something that will put a smile on your guests’ faces.”

She also recommends picking a mat that covers at least three-quarters of the entrance’s width and allows the door to open easily.

Change With the Seasons

While you are changing the front porch decor, swap a plain doormat for a festive option.

After the holidays, clean off your seasonal doormat and store it until the following year.

Match Materials

Doormats come in many materials, including ones that mimic entryway hardware. A rubber mat offers the wrought iron look without the weight and expense of the real material.

The punched-out spaces in a rubber mat also catch a lot of little pebbles, which can then be easily swept away with a broom.

Make It Feel Like Home

Doormat options are pretty much endless, so it shouldn’t be hard to find one that works for you.

By Brenna Malmberg, Houzz

The post How to Step Up Your Entry Design With a New Welcome Mat appeared first on Best Real Estate Agents in Northern Colorado.

Holiday Décor Trend: White-on-White Luxe

From a stunning mantel display to an elegant table setting, you can capture the magic of the holiday season in festive touches that are certain to make your home even more merry and memorable. The white-on-white design trend is definitely at the top of most luxury designers’ lists these days, and this extends to Christmas décor, as well. For some stylish inspiration, take a cue from these beautiful holiday decorating ideas.

table-dressing

This year it’s all about seasonal glamour, metallic flourishes meet elegant finishes for a luxury look to perfectly complement Christmas time at home.

gold-silver-white

Metallic decor is very popular for decor today because it’s stylish and gives a refined and elegant touch to any space. Silver and gold are the most used shades but copper has become a leader recently because of its soft and warm shade.

copper-and-white

White and gold décor can be bland without a deeper anchor color. Black accents lay low while bringing out the brightness of the white and metallic accents.

white-and-gold-2

A huge part of the white on white decorating trend this year is the flocked Christmas tree.

holiday-home-tour-monika-hibbs-1

If you are feeling devoid of color, adding a small amount of red to a flocked tree makes a huge impact.

red-and-white-and-silver

A light touch of pastel blue gives a softer impact while evoking the feeling of Christmas at Tiffanys.

05-aqua-blue-silver-and-white-christmas-decor

With all this white on white minimalism, you might start to feel a little snow blind – or simply bored. Another trend on the horizon is blue and green, inspired by the favored Peacock décor from the Victorian era.

28-white-stockings-an-ornament-garlands-of-various-shades-of-blue-and-green

The vivid colors are stunning on a white tree and blends very well with metallic accents in the home.

matching-colors-1

So what do the experts advise for decorating a tree? Here are a few tips to help guide you:

When in doubt, go for more lights. Nothing beats a well-lit tree.

Take a break and step away from the tree. It never hurts to revisit an hour later. You can often make just the right tweaks when you come back and look at something with a new set of eyes.

Don’t take decorating your tree too seriously. It is a tradition and is meant to evoke memories. Showcase your personality with your favorite ornaments and have fun with it.

Do what you love. You can be as creative as you want with your Christmas tree, so decorate it with whatever you’re into; shells, birds, or anything else. Just because you’re trimming a tree doesn’t mean you have to incorporate traditional standards.

The post Holiday Décor Trend: White-on-White Luxe appeared first on Best Real Estate Agents in Northern Colorado.

Make Your Home Safe for the Holidays

With all the cheer and celebration this time of year, it’s hard to believe anything bad could happen. However, statistics show there’s a significant increase in home-related accidents, fires, and burglaries around the holidays. To protect your family, friends and property, heed these six suggestions:

  1. Keep walkways, driveways and decks free of slippery ice or moss.
  2. Have your fireplace professionally cleaned, and only use one artificial log at a time.
  3. Check the batteries in all smoke detectors and make sure a working fire extinguisher is located on every floor, as well as the kitchen and garage.
  4. Snuff out any candles before leaving the room (even for a short while), and make sure to always keep them in short holders with wide bases so they don’t fall over.
  5. For holiday lights: Only use outdoor lights / extension cords in the outdoors, and plug them into GFCI protected outlets; make sure all lights are UL-approved; know that the smaller bulbs are safer; never leave them on when you’re not home.
  6. Plug a few lamps and the TV or stereo into timers to make it appear someone is home while you’re away. Also, ask a neighbor to park their car in your driveway, pick up any mail and keep an eye out for any suspicious activity.

Making the extra effort to keep your home safe will always be the best gift you could give family, friends and other visitors.

The post Make Your Home Safe for the Holidays appeared first on Best Real Estate Agents in Northern Colorado.

10 Projects to Start at Home Over a Holiday Weekend

Putting photos into albums, tidying your closet, making holiday gifts — a long holiday weekend can be the perfect time to tackle a project you’ve been wanting to get to but just haven’t had time for. Here are 10 ideas for home projects that are doable over a long weekend, from changing a light fixture to framing a treasured family recipe.

Home Projects 1: Titan Homes, original photo on Houzz

1. Make a meaningful display. The walls in this dining room feature framed recipes from the homeowner’s grandmother, hung alongside treasured family heirloom serving dishes and other favorite pieces. Create your own meaningful display for the holidays and beyond by framing a favorite family recipe (handwritten is best!) or collection of china. For a twist on this idea, try decoupaging a handwritten recipe (use a photocopy if you want to preserve the original) onto a plate or platter to create a unique and personal art piece.

2. Poll family and friends about a decorating or renovation decision you’ve been waffling on. Trying to choose the right paint color, upholstery fabric or kitchen tile? Use the holiday weekend as an opportunity to poll the family and friends who come over — even if you don’t agree with their preferences, it can help you figure out what you do want!

Home Projects 2: Sophie Sarfati, original photo on Houzz

3. Make a handmade holiday gift in multiples. If you’d like to try your hand at homemade gifts this year, it can be tempting to choose a different craft for each person on your list — but this can be a recipe for disaster as the days count down to Christmas and half your list remains unfinished. To maximize your time (and the cost of tools and materials) think up a project that’s easily repeated, and gift a version of it to multiple people. The mugs shown here would make a great project: Take plain store-bought cups and personalize them with handwritten messages in permanent marker.

4. Try the KonMari method of tidying. By now you’ve probably read (or at least heard of) the phenomenally popular book on decluttering, The Life-Changing Magic of Tidying Up: The Japanese Art of Decluttering and Organizing, by Marie Kondo. Use the long weekend as an opportunity to try out her method of decluttering your home, starting with your clothes.

Home Projects 3: H2 Design + Build, original photo on Houzz

5. Decide on a new light fixture or two. New lighting can completely transform the look and feel of a space. Having a light fixture replaced is usually a quick and easy job — an electrician can typically get it done in about an hour, more if you’re relocating the fixture or if you want to add a light where none currently exists. Try replacing your old dining room fixture with a beautiful pendant light or pair of lanterns, or change out the row of lights above your kitchen island.

6. Finally put loose photos in albums. Dig out a box of photos you haven’t gotten around to sorting, have a stack of blank albums at the ready, and hold a photo-organizing session solo or with family. To get through a lot of photos in a single afternoon, keep your albums simple, with just a few notes about the people and places featured.

Home Projects 4: rigby & mac, original photo on Houzz

7. Sort through baby clothes to make a memory quilt. Even if you’re not a quilter yourself, you can hire someone locally to use the fabric you provide to create a one-of-a-kind keepsake quilt. Sift through all those boxes and bins of saved baby clothes and pull out the most meaningful and lovely pieces to include in the quilt — just imagine how wonderful it would be to enjoy using those sweet little clothes again, instead of hiding them away in a box!

8. Put up picture shelves. If putting up a gallery wall of artwork has you feeling overwhelmed, take a different approach and install a row of picture shelves instead. The horizontal lines give the display structure, so you can mix and match sizes and shapes of frames as much as you wish — and with picture shelves, you can swap out your artwork whenever the mood strikes, without measuring or adding nail holes.

Home Projects 5: Traditional Bathroom, original photo on Houzz

9. Repaint the bathroom. Typically the smallest room in the house, the bathroom or powder room also tends to have very little wall space thanks to the tile and fixtures, which makes it a quick room to make over with paint. If you’ve been living with a plain white or builder’s beige bathroom, why not try a paint color with a bit more oomph? Slate, charcoal, mocha and silvery green are all elegant choices for the bath.

10. Put new planters on the front porch. Add fresh greenery to your entrance with a pair of matching topiary flanking the front door. If your region experiences cold winters, choose evergreen plants that can stand up to the weather, like boxwood or juniper. This simple change is a sure way to boost curb appeal and make your home look more inviting.

By Laura Gaskill, Houzz

The post 10 Projects to Start at Home Over a Holiday Weekend appeared first on Best Real Estate Agents in Northern Colorado.
Ten Ideas for New Thanksgiving Traditions

Most of us already have our “ways” of doing Thanksgiving – ways our mother did it, ways our extended family did it, ways our neighborhood did it. Thanksgiving doesn’t lend itself well to trying out new traditions, but sometimes the situation calls for it – you can’t make it home for Thanksgiving, for example, or you have a family now and want to start traditions of your own. So what can you do to heighten, deepen, and extend Thanksgiving to its most memorable end?

  1. Start the day with an indulgent, relaxing breakfast.

While some people are firmly in the “no breakfast” camp to save room for the big meal later, we love the idea of starting the day in such a festive, delicious way! Pancakes, waffles, eggs, even pie – it’s all good.

  1. Take time for yourself before time with family.

As wonderful as Thanksgiving can be, we all know it can be exhausting and overwhelming. That’s why it’s such a good idea to deliberately take a little time for yourself during the day to make sure you enjoy the holiday on your terms.

  1. Remember loved ones who have passed.

Holidays can be bittersweet when beloved family members or friends are missing from the gathering. Look through old photo albums and recall funny, tender or important achievements of those who are gone but not forgotten.

  1. Write your thanks on a butcher paper tablecloth.

Cover the table with butcher paper. During the meal, distribute pens and ask each family member to write down a few things they’re thankful for on the paper and then take turns reading them out loud. We love the practice during the Thanksgiving meal of naming things you’re thankful for, and this is a unique way to do it – especially since you can tear off and save particularly meaningful memories.

  1. Let everyone toast!

Another way to make gratitude gushing even more festive is to let everyone make a toast. Raise your glass to the year, to your family, to your friends!

  1. Have the kids serve dessert.

Let the bigger kids get in on the action of serving to their family.  Put them in charge of delivering dessert and coffee after the meal. The oldest can plate and pour while the younger kids can take orders and serve. It keeps them busy after the meal while the adults talk and gives them a broader sense of appreciation for the holiday.

  1. Have Thanksgiving dinner early.

Planning for a 3 p.m. dinner shifts the momentum of the day. An earlier meal creates a more relaxed celebration, plus there’s plenty of time to digest before going to bed.  An earlier dinner also accommodates traveling guests and lets them return home at a reasonable hour.

  1. Take a long walk together after dinner.

No one is ready for dessert right after dinner anyway, so why not take that time to go on a long walk with your loved ones? Enjoy the cool, crispy (and hopefully dry) autumn weather and get the blood flowing again after all that rich food.

  1. If it’s just two of you, really treat yourself.

It can be hard to justify making a huge Thanksgiving meal when it’s just two of you, but that doesn’t mean it has to be any less special, or even any less of a treat. In fact, it should be more so. Make it special by treating yourselves to nicer ingredients and better wine than you would normally use if you were cooking for a large group.

  1. Stay connected with family members far away.

If you can’t be with your loved ones on Thanksgiving, thankfully you can still be together – just virtually! Do a video call or Google Hangout before dinner, or Facetime family members in for the giving-thanks portion of the evening.

This article originally appeared on WindermereSeattle.com 

The post Ten Ideas for New Thanksgiving Traditions appeared first on Best Real Estate Agents in Northern Colorado.