Renovating Your Short-Term Rental

Renovating your short-term rental property will not only keep it in peak condition but will also help it stand out to potential renters. Completing remodeling projects with the goal of increasing the return on your investment is a matter of identifying which renovations make sense for the home, putting together a plan, and taking steps to minimize the risk of the projects going over budget.


Start with Repairs

Because rental properties are by nature a source of income, it’s worth your while as the homeowner to reduce maintenance costs wherever possible. This can often mean spending money in the short term on repairs and replacements in order to save money down the road. Furthermore, by upgrading your appliances, fixing leaks, and updating any outdated features, you will provide the most accommodating environment for your renters. Making these improvements can also help set your rental apart from other properties, giving you a competitive advantage in the market. As you go about making repairs, don’t forget to check the working condition of all faucets, electrical outlets, and lights.


Renovating Your Rental

Understanding the scope of your renovations and the motivation behind them before you get started will help formulate your plan moving forward. Are you looking to upgrade the home to sell it in the future? Are you renovating to increase rent? Or are you simply looking to be more competitive in the local rental market? Knowing the answers to these questions won’t necessarily change your renovation plans, but it will provide guidance as you enter the remodeling phase. Consider talking to your Windermere agent about how different projects may affect the value of the property.

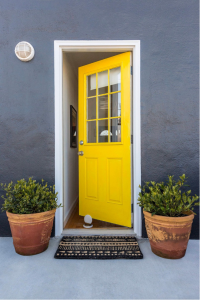
Even a small-scale renovation can make a big difference in the minds of renters. To create the best first impression from the get-go, consider boosting your home’s curb appeal. Projects like exterior painting, refinishing a deck, and power washing your siding and walkways will help provide an inviting outdoor setting for your renters.

When it comes to interior renovations, kitchens are a great place to start. Thankfully, kitchen makeovers can be simple. Identify the areas of your kitchen that need repair first, then expand your project list from there. Next, consider upgrading the bathroom. Begin by checking your pipes, drains, and p-traps for any signs of wear and tear. Simple things like painting the vanity and updating the bathroom hardware can also make a big impact.

Last but not least, if you decide to hire a professional to renovate your rental property, be sure to gather multiple bids and compare prices before making your final decision.

Learn more about the pros and cons of investing in vacation rentals here: Vacation Home or Income-Producing Investment. You can also read about vacation home renovations by season here: Renovating Your Vacation Home.

The post Renovating Your Short-Term Rental appeared first on Fort Collins Real Estate | Fort Collins Homes for Sale & Property Search.

Ideas for Decorating with Plants

At the mention of interior design, the first things that often come to mind are furniture, wall art, paint colors, and other material components. However, plants are an important décor element that have the power to refresh the look and feel of any indoor space, while making your home eco-friendlier. Keep the following tips in mind when decorating your home with plants.


Consider Your Space

Before you make a trip to the nursery, think about which spaces in your home are best suited for plants. It’s also important to research the needs of the plant varieties you’re considering. By knowing how much shade and direct sunlight they need, you’ll be able to identify the best home for each plant type and the care they need to grow.


Go Vertical

Empty vertical wall spaces provide the perfect opportunity to incorporate hanging plants. Whether you use planters or install shelving, hanging plants attract the eye and bring an organic, living element to what was previously a blank canvas. Hanging herb gardens are a wonderful addition to the kitchen, allowing you to keep fresh ingredients and flavors out in the open air and within reach at all times.


Floor Plants

Floor plants are typically large and require plenty of space. Due to their size, they are often used to balance the proportion of rooms containing large furniture items like couches, desks, and tables. Common floor plants include the fishtail palm, olive trees, the rubber plant, fiddle leaf fig, and bird of paradise.


Low Maintenance Plants

For those who don’t consider themselves to be green thumbs, cacti and succulents are the way to go. Most succulents come from hot climates with little humidity and have thick tissue that stores water for long periods. Accordingly, they are lower maintenance than most other plants and require little watering.


Decorate with Terrariums

Another creative, relatively low-maintenance option for indoor gardeners is a terrarium. Terrariums are contained indoor gardens, usually in a glass container that can be left either sealed or open. Closed terrariums are self-nourishing, creating their own water cycle. Plants that grow in humid conditions are best suited for this environment. Open terrariums provide a good home for plants that need less water, like cacti and succulents. Terrariums make for eye-catching décor, with styles ranging from minimalistic to intricate.


For more information on home design and the latest trends, check out our tips on how to upgrade your bedroomhome office, and kitchen, as well as the 2021 paint color trends and principles of timeless home design.

The post Ideas for Decorating with Plants appeared first on Fort Collins Real Estate | Fort Collins Homes for Sale & Property Search.

How to Prevent Water Damage to Your Home

Water is constantly coursing through your home, flowing in and out of drain pipes, sinks, tubs, and showers. Numerous systems in our homes are dependent upon water, but the minute it runs rampant it begins to cause damage. The consequences of water damage run the gamut, from rotted drywall and mold growth to serious structural issues. The following guide will help you understand what you can do to prevent water damage in your home.

Leaks

Leaks soften wood, which invites all sorts of unwanted activity from termites, while simultaneously creating a perfect habitat for mold and mildew growth. To prevent leaks, keep your drains healthy by frequently cleaning out your drain strainers and refraining from dumping grease down your drains. Check to make sure none of your drains are leaking and if need be, repair or replace your p-traps. Drips, dark stains around your pipes, and discoloration on your ceilings and walls are all strong indicators that a leak has sprung. If you notice an inexplicable spike in your water bill, this is also a sign of a potential leak. By identifying these signs, you can begin repairs right away and stop the water damage in its tracks.

Gutter drainage

A home with weak gutter drainage is an open invitation for water damage to occur. Cleaning your gutters routinely is the best way to prevent them from clogging, which helps to avoid damage to your siding and foundation. Make sure your downspouts expel the gutter water away from your house parallel to the ground. Take a trip to the hardware store for downspout extensions and elbows to make sure that water won’t build up around your home’s foundation, especially if you live in a rainy climate.

Sump pump

Your sump pump can be your saving grace should a water emergency occur. Sump pumps move excess groundwater away from your home, preventing it from infiltrating your basement or crawl space. They are connected to the Ground Fault Circuit Interrupter (GFCI) electrical outlet, which protects it from electrical shorts. There are two ways to test your sump pump. The first is by pouring in enough water to raise the float. If it’s working properly, the pump should activate and begin removing water from its pit. The other method is to unplug the pump’s power and plug it back in. If it does not turn on, it requires repair or replacement.

More

There are some additional steps you can take to prevent water damage to your home. Inspect your roof to identify any damaged shingles or cracks. While you’re up on the roof, take a look at your chimney. Repair any cracked or broken bricks and consider a chimney cap if you don’t already have one in place.


Water damage can be harmful to your home and your finances. Even the smallest leak can snowball into larger problems if neglected. By following the steps to prevent water damage, you’ll know if your home needs repairs before it’s too late. For more advice on preventing damage to your home, read our guides to wildfire and winter storm prevention.

The post How to Prevent Water Damage to Your Home appeared first on Fort Collins Real Estate | Fort Collins Homes for Sale & Property Search.

7 Ideas for Creating a Beautiful Yard

1. Remodel Your Patio

The best patios are durable and long-lasting. If your patio requires repair, a remodel can play a significant role in creating the beautiful backyard you envision. Think about how your patio will be used before choosing materials. For example, if you plan on using it as a dining area, an uneven material like cobblestone may not be the best choice. Design your new patio pattern, including gaps between pavers for loose materials, before getting started.


2. Upgrade Your Deck

Decks can often be the focal point of a backyard. A few upgrades can easily transform the look and feel of the space. If you are building a new deck, take your local climate into account when deciding on materials. To upgrade your existing deck, create a seating area using chairs or a bench and decorate the area with plants to make it feel more welcoming. Pergolas and patio umbrellas will help to keep the area shady and cool while adding some color to the space. If you are rebuilding, consider building in seating during construction.


3. Start a Vegetable Garden

Gardens don’t just pop up in your backyard overnight, they take time to grow. Start by building your garden beds, aligning them north to south for maximum sunlight. Choose an area of your backyard where your veggies will have direct access to sunlight, without being blocked by shade from trees and shrubs. Research your local climate to determine which vegetables you should grow and what kind of yield you can expect. To protect your garden from weeds, insert a barrier in the bottom of the beds.


4. Edge Your Walkways

Nothing catches the eye in the garden like clean, crisp edging. Edging comes in a variety of materials, from plastic to more durable options like aluminum or steel. Before you install the edging, use a lawn edger or spade to make the cuts and shape the pattern. Tap the edging it into the ground with a mallet to solidify it into the ground and to protect it from animals.


5. Add Landscape Lighting

A beautiful backyard deserves to be enjoyed around the clock. Landscaping lighting can extend those days spent in the yard well into the nighttime. There is an array of landscaping lighting options to choose from, including spotlights, floodlights, in-ground lighting, outdoor post lights, and more. Choose the one that best highlights the features of your yard.


6. Install a Fire Pit

Fire pits help to tie a backyard together. The style of your fire pit should match other features in your backyard to bring cohesiveness to the space. Traditional fire pits are usually accompanied by circular seating, while more modern options like fire troughs provide a centerpiece to take in surrounding views. Wood fire pits provide a classic, crackling environment, gas pits burn cleaner than wood and come with an on-off switch, while gel-powered fire pits create a smaller frame and are typically used for accent lighting.


7. Add Garden Containers

Garden containers of all shapes and sizes can be very useful in the yard, especially for homeowners with limited garden space. By adding pots, wooden boxes, or bowls to your yard, you’ll provide a flexible home for a variety of plant life. Just make sure each container has proper drainage holes. If not, you’ll need to make the holes yourself, or you can opt for self-watering pots.

The post 7 Ideas for Creating a Beautiful Yard appeared first on Fort Collins Real Estate | Fort Collins Homes for Sale & Property Search.

Enormous Equity

Hot off the press is the Core Logic Homeowner Equity Report.  This is their quarterly look at what is happening with homeowners’ equity across the country.

Here are the staggering numbers coming out of their research:

  • Collectively, U.S. homeowners with mortgages have realized a $1.5 Trillion gain in equity over the last 12 months.
  • Only 2.8% of all mortgaged properties have negative equity meaning the home is worth less than the loan amount.
  • In Colorado, just 2.5% of homeowners have negative equity.  For comparison, the percentage in Louisiana is 10.7%.

This research is one of many reasons why we don’t see any sort of impending housing crisis like we experienced in 2009.  In the fourth quarter of 2009 for instance, 26% of all homeowners had negative equity.

The post Enormous Equity appeared first on Fort Collins Real Estate | Fort Collins Homes for Sale & Property Search.

Simple Bathroom Upgrades

The thought of upgrading a bathroom often brings to mind large-scale renovations, demolition, and hefty price tags. Even projects like replacing a backsplash or repairing tile can be more involved than you might think. However, it’s possible to give your bathroom a makeover without breaking the bank (or your back). Whether you’re looking to just freshen it up or make it feel like your own personal spa, these simple projects can help take your bathroom to the next level.

Upgrade your Décor

If you want to make a big splash without spending big money, consider upgrading your bathroom with new décor. A fresh coat of paint on the walls or a bold, patterned wallpaper can completely change the character of the space, while accent pieces like a new shower curtain and towel racks can reinforce your color choices. Installing shelving is a simple, functional tactic that gives dimension to your walls. Whether it’s in the shower, above your toilet, or beside your vanity, a shelf can save surface space while helping to tie the room together.

Upgrade your Tub

Upgrading your tub doesn’t have to mean buying a replacement. Simply refinishing your tub will have it looking brand new and helps you save money. Over time, tubs accumulate cracks, dings, and discoloration due to mold, but refinishing can cure these imperfections right away. Start by removing all hardware from the tub. Sand the whole surface, fill in any cracks or holes with putty or epoxy, then sand them smooth. Apply multiple layers of primer and topcoat, give it a buff, and enjoy your brand-new bathtub.

If refinishing your tub is too much to handle, consider simply touching it up. Fill in any cracks and apply a fresh line of caulking around the surface. After this is done, shop around for new tub hardware to polish off your cost-effective bathtub makeover.

Upgrade Your Vanity

With just a few tweaks, you can turn your vanity area from a mirror with counter space to an impactful centerpiece. Instead of going all out with a new cabinet install, simply replacing your cabinet hardware and drawer pulls can make a big difference. Think of ways your new hardware can reinforce the style of your bathroom. Match them with your shower rod, faucet, and showerhead to make your bathroom more eye-catching.

Your vanity also offers a great opportunity to add some color to your bathroom. Giving it a fresh coat of paint will help to liven up the space at a low cost. For wooden vanities, a re-stain is a great way to give them new life. Start by removing the doors and drawers. Apply wood stripping to all surfaces, then let them sit for the recommended time. Now you can begin to scrape away the old finish. Sand down all surfaces and apply the primer before staining the wood. Once your stain settles in, apply a second coat and your vanity will be good as new.

Finishing Touches

Well-organized surfaces and compartments will help to create serenity in your bathroom. Whether it’s in the shower, the medicine cabinet, or below the vanity, look for multipurpose organizers that help cut down on bathroom clutter and save space. Add in natural elements like bamboo and river rocks to make your bathroom feel like a soothing sanctuary.


For more ideas on affordable home makeovers, check out our tips for upgrading your bedroomhome office, and kitchen.

The post Simple Bathroom Upgrades appeared first on Fort Collins Real Estate | Fort Collins Homes for Sale & Property Search.

DIY Remodeling vs Professional Remodeling

Deciding whether to DIY a remodeling project or leave it to a professional is a matter of weighing the risks and rewards, time, and budget. Before you start applying a new coat of paint or go about knocking down a wall, create a plan for your remodel to help you decide which projects you can handle, and which ones belong in the hands of a pro.

Create Your Remodeling Plan

Knowing your plans for your remodel will help to determine your timeline and budget, which will inform your DIY-vs-Pro decision-making. Set specific goals for each project so you’ll know when you’re getting off track but remain flexible in your planning to leave room for any unexpected hurdles that will inevitably pop up in the remodeling process. Your budget will also help you decide who should execute certain projects. For example, if you’re budgeting more for a kitchen remodel than any other project, that is a likely candidate for professional help.

If you’re having trouble deciding the best route to take with your remodeling projects, ask yourself the following questions:

  • What risks am I comfortable taking on?
  • How much time am I willing to dedicate to this project?
  • Does this project require a permit?
  • Do I have any experience with this kind of remodel?
  • Am I comfortable giving up control of this project?


DIY Remodeling Pros and Cons

Pros: Taking a DIY approach to remodeling projects pays dividends in many ways. Without having to pay labor costs, you stand to save significant money by tackling a project on your own. Going DIY also allows you to set your own schedule for the project. And of course, the sense of ownership and pride you will feel knowing you completed the project on your own is a priceless feeling for a homeowner.

Cons: DIY projects can be consequential. Mistakes at any point in the renovation process can lead to greater costs and sometimes, hiring a professional to fix the mistake. Unfortunately, this can result in the loss of significant time and money.


Professional Remodeling Pros and Cons

Pros: Professionals are inherently more experienced, bringing their specialization to the table on every home renovation project, so you can expect them to perform high-quality work that will increase the value of your home.

Cons: Getting professional quality work means paying for it. When budgeting, expect higher costs for any project you’re thinking of outsourcing to a pro. Bear in mind that, especially for large-scale renovation projects, your home will become a construction site. Accordingly, you may need a back-up plan, such as a temporary kitchen set-up or a short-term rental home .


DIY Remodeling vs Professional Remodeling: Around the House

The following list breaks down which projects are typical DIY candidates and which ones homeowners commonly opt for professional help to complete. However, the decision is ultimately up to you. If you have your heart on tackling a project on your own, gather your tools and make it happen!

Kitchen

  • Professional: Any large-scale structural changes, new gas lines, or new plumbing projects should be handled by a professional.
  • DIY: Simpler kitchen projects like a backsplash or faucet replacement and any cabinet finishing tasks are perfect DIY candidates.

Bathroom

  • Professional: Plumbing installation, running electricity, or any projects involving an expansion or alteration to your bathroom structure.
  • DIY: If your bathroom is simply in need of some new tile work, basic medicine cabinet restoration, or minor flooring improvements, roll up your sleeves and DIY.

Backyard

  • Professional: Consider hiring a professional for any significant outdoor projects like concrete builds, in-ground pools, and technical deck work.
  • DIY: Common backyard DIY projects include building a garden tool shed, building a fence, and refinishing a deck.

General

  • Professional: It is best to hire pros for new roofing, any foundation work, and extensive demolition projects. For asbestos and drywall finishing, it’s easiest, and safest, to go with the pros.
  • DIY: Any interior painting projects, basic electrical work, or simple trim and door upgrades.

If you’re planning on going through a remodel while you live at home, read this first. For more information on how certain renovations may impact the value of your home, talk to your Windermere agent.

The post DIY Remodeling vs Professional Remodeling appeared first on Fort Collins Real Estate | Fort Collins Homes for Sale & Property Search.

Incorporate Pantone’s Color of 2021 Into Your Home

For the second time ever, Pantone’s Color of the Year is actually two colors: Ultimate Gray and Illuminating Yellow. Ultimate Gray is emblematic of natural elements that stand the test of time, while Illuminating Yellow is a cheerful sunshine yellow, symbolizing energy and clarity.

Here are some ways you can harness this color harmony in your home.


Bedroom

Brighten Your Bedroom

With a foundation of Ultimate Gray, Illuminating yellow will brighten your bedroom, livening up the space and radiating positivity. Mix and match different furniture and accent wall combinations to get the right balance of sunny yellow and solid gray.


Refresh Your Home Office

Home offices have become more important than ever. As working from home continues in 2021, your remote workspace is the perfect location to add in Pantone’s Color of the Year. We all could use some added stimulation to keep our workdays going smoothly and productively. Use Illuminating to add some colorful accents or to paint your wall, balance it out with some Ultimate Gray, and let the positivity fill your home office. Office

Accents In Your Living Room

Pantone’s Illuminating is a perfect accent color for your home. Incorporate this energetic sunshine yellow in your living room in the form of decorative throw pillows, blankets, and accent décor Living Roompieces like vases and curtains. Ultimate Gray is a perfect color for large furniture items and will help to balance out the tone of your living room. It provides a neutral backdrop, which gives you the freedom to decorate brightly.


Make A Statement With Your Front Door

EnteranceYour front entrance plays a significant role in the first impressions of your home. What better way to use Pantone’s striking yellow than a front door makeover? Illuminating yellow presents an opportunity to bring a little sunshine to your family and guests every time they approach. Ultimate Gray as both a wall color and an accent color will help to solidify your new, strikingly optimistic front door. Accent pieces like house numbers, your mailbox, and plant pots will help create harmony between the two colors.


Read more about this year’s color trends and how you can incorporate them into your home here: 2021 Paint Color Trends


The post Incorporate Pantone’s Color of 2021 Into Your Home appeared first on Fort Collins Real Estate | Fort Collins Homes for Sale & Property Search.